Plastic injection molding is a key method for creating precision parts. But what drives its success? The mold core and cavity. These components form the internal and external features of molded products.
In this post, you'll learn how the core and cavity work together, why they're essential, and their critical differences.
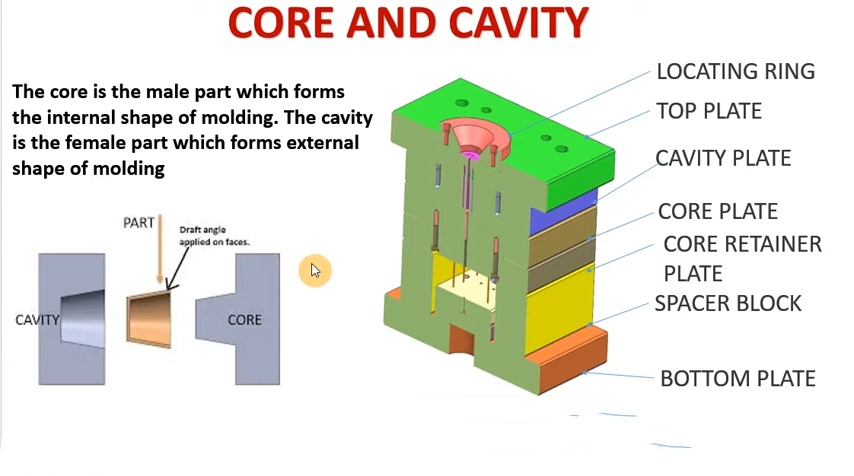
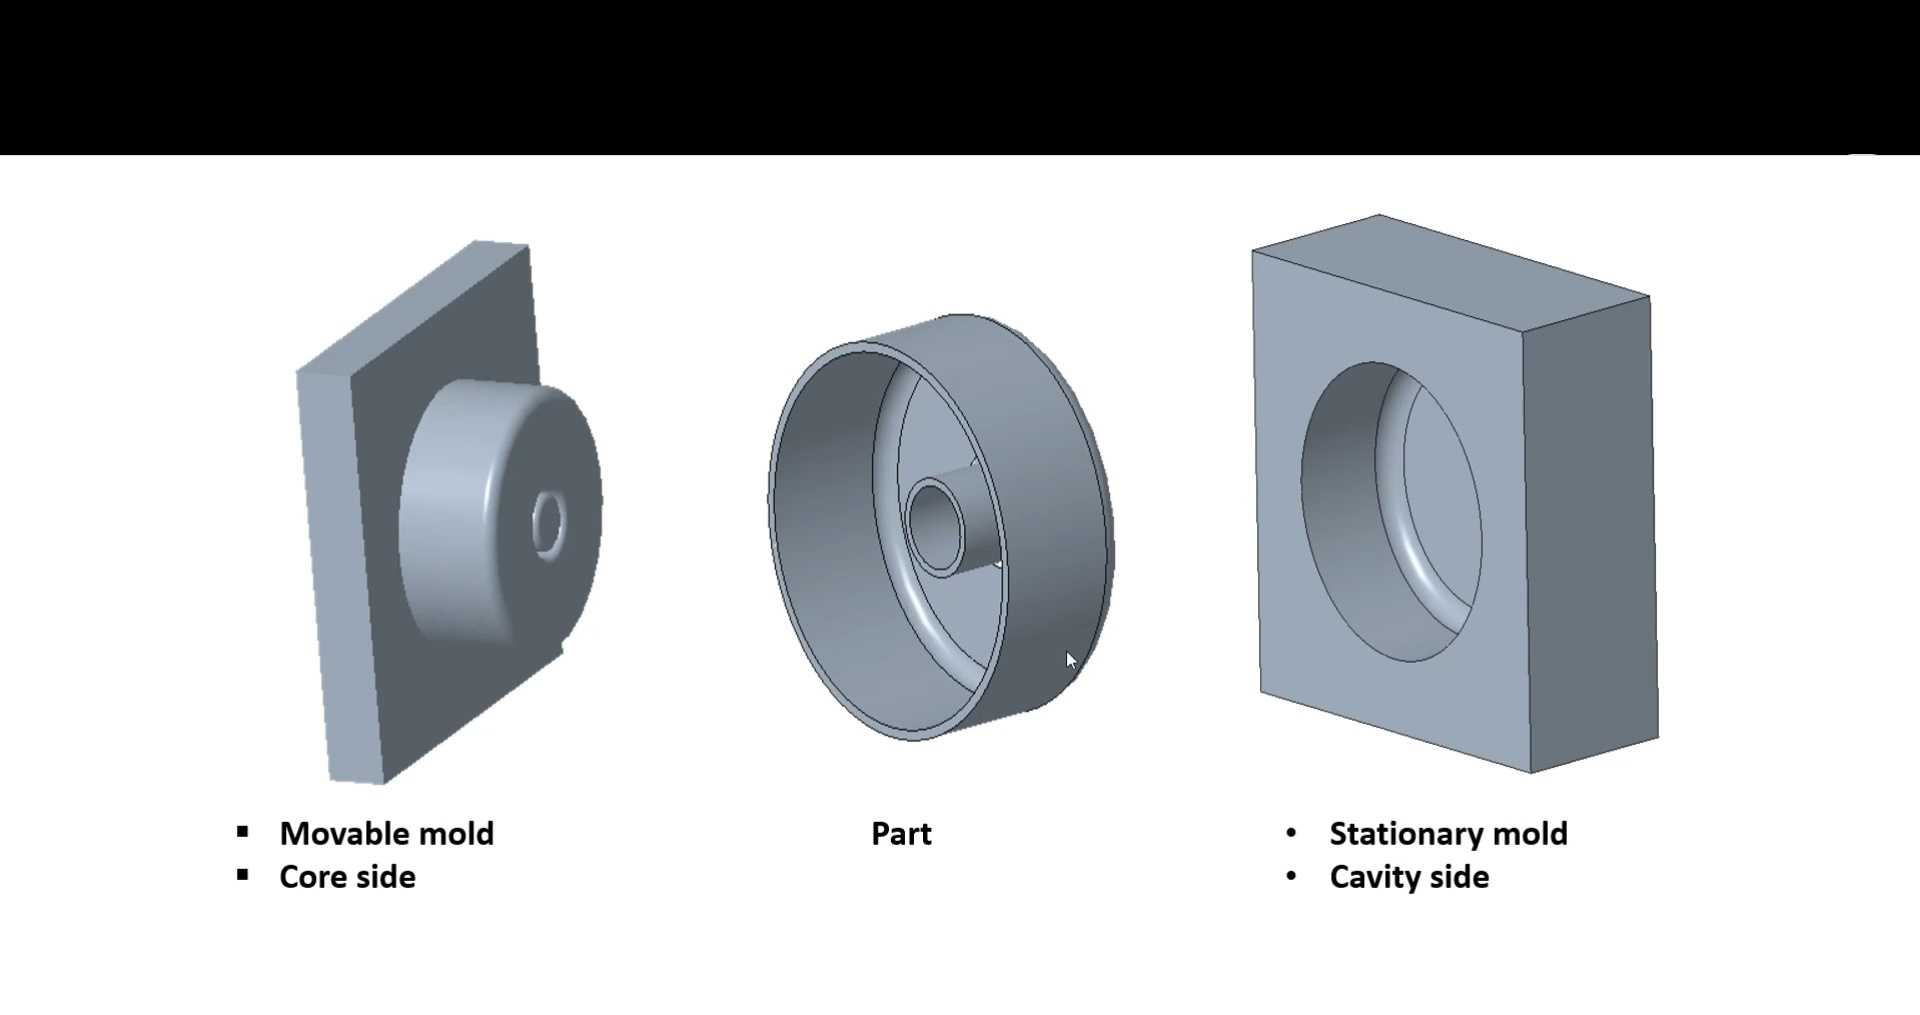
Core and Cavity: Definition and Roles
The Mold Core
The mold core shapes internal features of injection molded parts. It's crucial for creating hollow sections and complex internal structures. During the injection process, the core sits in the B-side of the mold. It moves with the ejector system, ensuring parts release properly after cooling.
Key points about mold cores:
Form inner cavities and details
Usually made from hardened steel
Require precise machining for accuracy
Often include cooling channels for faster production
The Mold Cavity
Mold cavities define external features of molded parts. They're responsible for the outer aesthetics and dimensions. Cavities remain stationary in the A-side of the mold during production. They create the visible surfaces customers interact with.
Important aspects of mold cavities:
Shape outer surfaces and textures
Often polished for desired finish
Must account for material shrinkage
Include gating systems for plastic flow
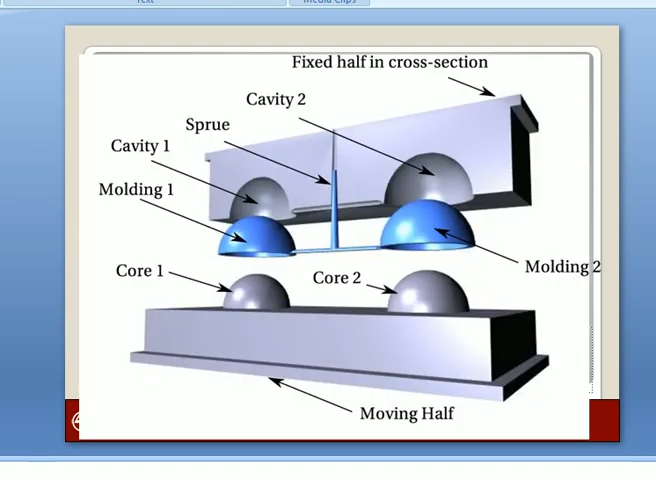
How Core and Cavity Work Together
Cores and cavities combine to form complete molded parts. When the mold closes, they create a void in the shape of the final product. Molten plastic fills this space, taking on the features of both components.
The interaction process:
Mold closes, aligning core and cavity
Plastic injected into the formed space
Material cools and solidifies
Mold opens, core moves with ejector system
Part releases, retaining shapes from both core and cavity
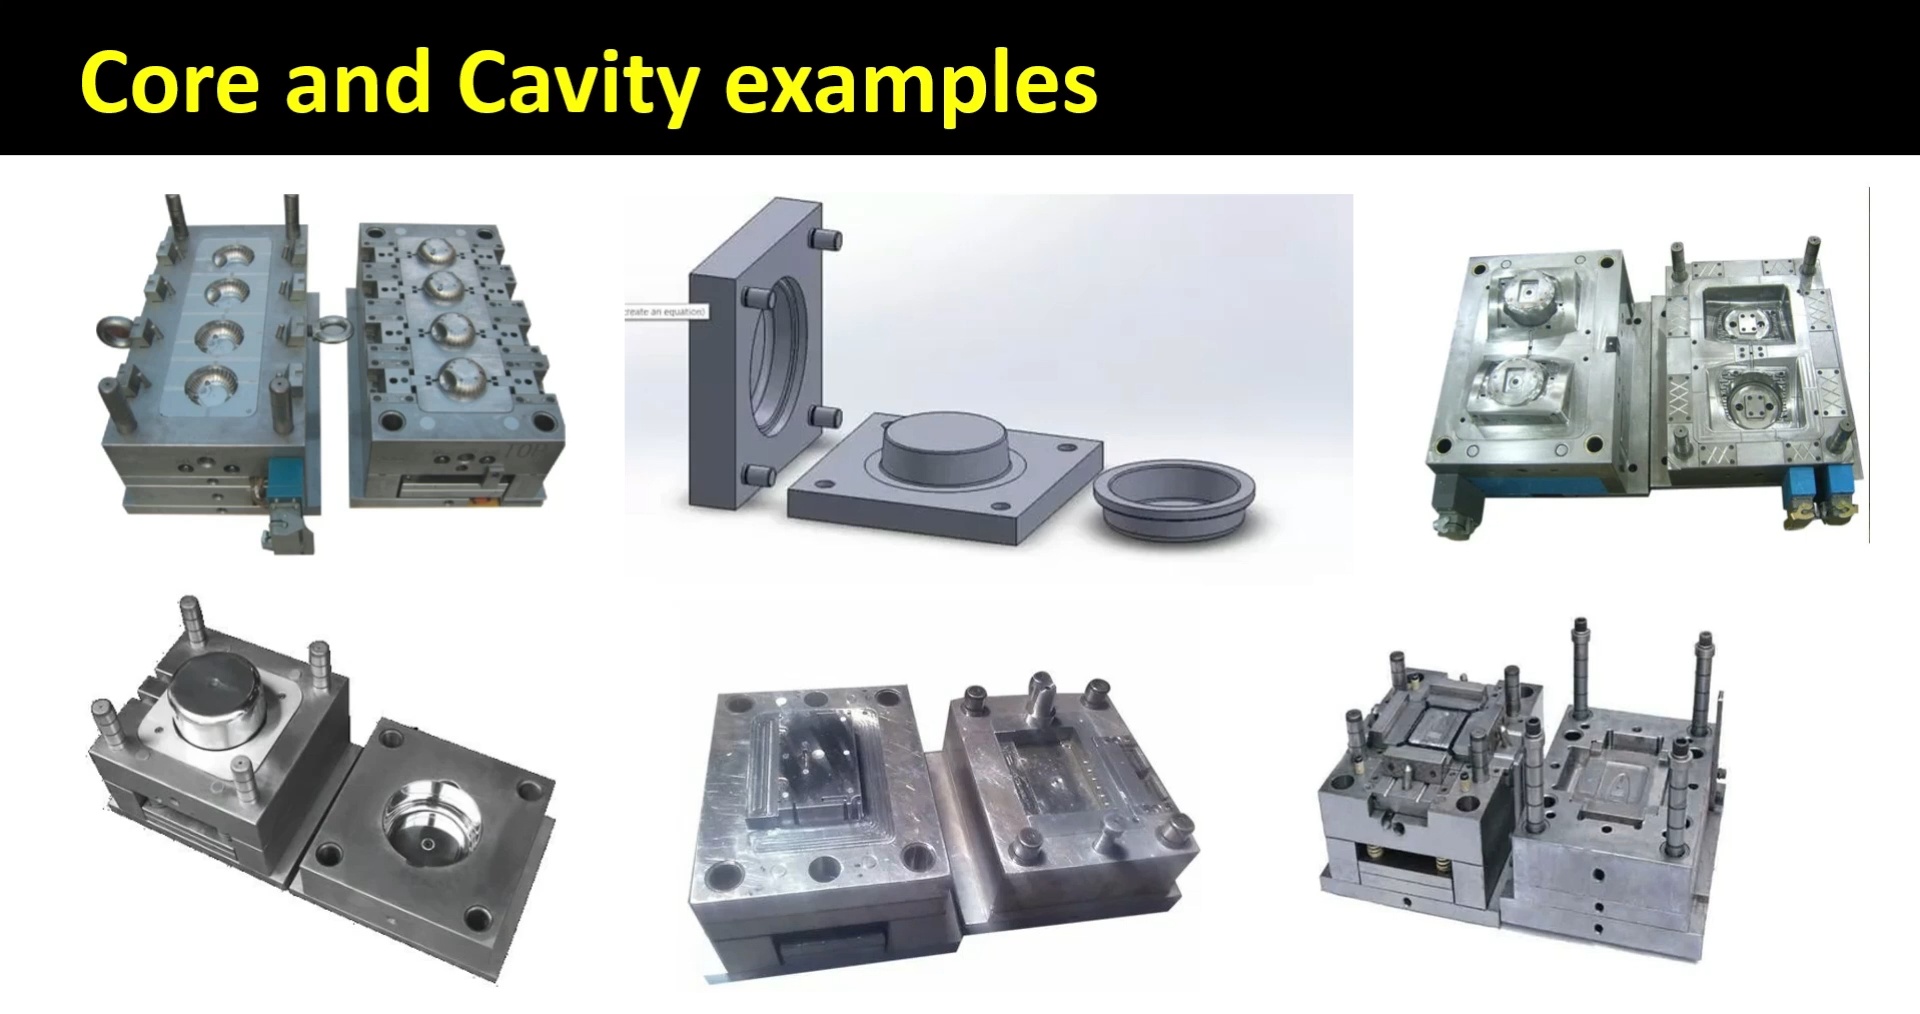
Types of Mold Cores and Cavities
Fixed Cores and Cavities
Fixed cores and cavities are the foundation of injection molding. They remain stationary throughout the production process.
Standard Cores and Cavities
These are basic components machined from hardened steel. They're designed for long production runs and consistent part quality.
Simple Core/Cavity
Used for parts with straightforward shapes. They're ideal for products without complex internal features.
Multi-Core/Cavity
These molds produce multiple parts in one cycle. They increase production efficiency but require careful design for balanced filling.
Interchangeable Cores and Cavities
Interchangeable components offer flexibility in production. They allow for quick changeovers and product variations.
Replaceable Cores and Cavities
These can be swapped out to produce different part designs. They reduce tooling costs for product families.
Sliding Cores and Cavities
They move within the mold to create complex features. Sliding components are essential for parts with undercuts or side details.
Insert Cores and Cavities
These are used to create specific features or incorporate pre-formed components. They're often used for threaded inserts or special materials.
Collapsible Cores
Collapsible cores are crucial for parts with internal threads or complex hollow sections. They contract to allow part ejection, then expand for the next cycle.
Key benefits:
Unscrewing Cores and Cavities
These components rotate to release parts with threaded features. They're essential for molding screw caps, fittings, and similar products.
Advantages:
Produce fully-formed threads in one step
Eliminate secondary operations
Increase production efficiency for threaded parts
Designing Mold Cores and Cavities
Key Design Factors
Designing effective mold cores and cavities requires careful consideration of several factors:
Part Geometry: Complex shapes demand precise core and cavity designs.
Material Selection: Different plastics require specific mold materials and finishes.
Shrinkage: Account for material shrinkage to ensure dimensional accuracy.
Draft Angles: Proper angles facilitate easy part release.
Ejection System: Plan for efficient part removal without damage.
Cooling System: Optimize cooling channels for consistent part quality.
Design Guidelines
Follow these guidelines for successful mold core and cavity design:
Uniform Wall Thickness
Maintain consistent thickness throughout the part.
Prevents warping, sink marks, and uneven cooling.
Proper Draft Angles
Radii and Fillets
Venting and Gating
Common Challenges and Solutions
| Challenge | Solution |
| Undercuts | Use sliding cores or collapsible inserts |
| Thin walls | Implement cascade or sequential gating |
| Weld lines | Optimize gate locations and melt temperatures |
| Sink marks | Adjust cooling system and wall thickness |
Material Selection for Core and Cavity
Importance of Material Choice
Selecting the right materials for mold cores and cavities is crucial. It directly impacts mold life and overall production costs. Proper selection ensures durability, precision, and cost-effectiveness.
Commonly Used Materials
Several materials are popular for mold cores and cavities:
P20: Versatile steel with good machinability
738: Improved properties over P20
NAK80: Excellent for high-polish applications
2316: Ideal for corrosive plastics
2344: Suited for high-volume production
Production Volume Considerations
Material choice varies based on production volume:
High-volume production justifies investing in premium materials. They extend mold life and reduce long-term costs.
Key Material Characteristics
When selecting materials, consider these properties:
| Characteristic | Importance |
| Wear Resistance | Prolongs mold life |
| Toughness | Prevents chipping and cracking |
| Polishing Properties | Achieves desired surface finish |
| Hardness | Resists deformation under pressure |
Wear Resistance
Materials with high wear resistance maintain dimensional accuracy over time. They're essential for high-volume production.
Toughness
Tough materials withstand the stresses of repeated molding cycles. They reduce the risk of premature mold failure.
Polishing Properties
Some materials polish better than others. This is crucial for parts requiring high-gloss finishes.
Hardness
Harder materials resist deformation under injection pressure. They maintain part precision but may be more difficult to machine.
Manufacturing Process of Mold Core and Cavity
1. Material Preparation
The process begins with selecting appropriate materials and tools. This step is crucial for ensuring mold quality and longevity.
2. Traditional Milling
Initial shaping involves:
These operations form the foundation of the mold structure.
3. CNC Machining
Rough cutting defines the basic shape of the core and cavity. CNC technology ensures precision and efficiency in this stage.
4. Heat Treatment
This step enhances:
Durability
Wear resistance
Dimensional stability
Heat treatment is essential for prolonging mold life.
5. Grinding and Finishing
Precision grinding achieves:
6. CNC Finishing
High-precision operations include:
Fine detail cutting
Engraving
Text application
These steps add crucial features to the mold components.
7. Wire Cutting
Wire EDM creates complex shapes such as:
Lifter holes
Ejector pin slots
Intricate contours
8. Electrical Discharge Machining (EDM)
EDM excels at producing:
Fine grooves
Narrow slots
Precise cavities
It's ideal for features difficult to machine conventionally.
9. Mold Polishing
Final surface finishing involves:
10. Assembly
This stage includes:
Proper assembly ensures optimal mold function.
11. Trial Molding
Testing the completed mold involves:
This final step confirms the mold is ready for production.
Different Steps of Mold Core and Cavity in the Injection Molding Process
The injection molding process involves a carefully choreographed interaction between the mold core and cavity. Understanding this sequence is crucial for grasping the full scope of injection molding.
Step 1: Injection
Plastic granules enter the closed space formed by the mold cavity. This space, created by the precisely engineered core and cavity, defines the shape of the final product.
Key points:
Step 2: Cooling and Solidification
The mold core fits tightly with the cavity during this phase. As the plastic cools, it takes on the exact shape of the core-cavity combination.
Important aspects:
Step 3: Mold Opening and Ejection
After solidification, the mold core moves away. The product, now solid, is ejected from the core through the ejection system.
Process details:
Mold opens
Core retracts
Ejector pins activate
Part releases from core
Mold Cavity's Role
Throughout these steps, the mold cavity remains stationary. It provides a stable reference point for the part's external features.
Cavity functions:
Maintains outer shape
Supports gating system
Houses cooling channels
This choreographed process ensures consistent, high-quality parts production. The interplay between core and cavity is fundamental to successful injection molding operations.
Pressure Differences Endured by Mold Core and Cavity
The mold core and cavity experience varying pressure levels during injection molding. These differences significantly impact part quality and mold longevity.
Mold Cavity: High-Pressure Zone
The cavity withstands higher pressures for several reasons:
Ensures complete filling of the mold
Maintains integrity of product's internal structure
Compensates for material shrinkage
Key points about cavity pressure:
Can reach thousands of PSI
Varies based on material and part design
Affects surface finish and dimensional accuracy
Mold Core: Lower Pressure Area
In contrast, the core endures lower pressures. Its primary functions include:
Shaping the product's exterior
Ensuring a perfect appearance
Facilitating part release
Core pressure considerations:
Generally lower than cavity pressure
Focused on external features
Impacts surface quality and detail reproduction
Pressure Distribution Table
| Mold Component | Pressure Level | Primary Function |
| Cavity | High | Internal structure integrity |
| Core | Lower | External appearance perfection |
Understanding these pressure differences is crucial for:
Proper mold design
Material selection
Maintenance planning
Usage Cycle and Maintenance Frequency Differences between Mold Core and Cavity
Mold Cavity: Higher Maintenance Needs
The mold cavity experiences greater stress during injection molding:
These factors lead to more frequent maintenance requirements:
Regular inspections
Periodic polishing
More frequent replacements
Manufacturers often schedule cavity maintenance to ensure consistent product quality.
Mold Core: Lower Maintenance Requirements
In contrast, the mold core enjoys a less demanding role:
This results in:
Fewer maintenance checks
Less frequent replacements
Lower overall maintenance costs
Comparison Table
| Aspect | Mold Cavity | Mold Core |
| Pressure Exposure | High | Lower |
| Wear Rate | Faster | Slower |
| Service Life | Shorter | Longer |
| Maintenance Frequency | Higher | Lower |
| Replacement Needs | More Often | Less Often |
Impact on Production
Understanding these differences helps manufacturers:
Plan maintenance schedules effectively
Budget for replacements accurately
Optimize production efficiency
Regular cavity maintenance ensures product quality remains high. Less frequent core maintenance reduces downtime and costs.
Methods to Differentiate Mold Core and Cavity
Distinguishing between mold cores and cavities is crucial for effective mold design and maintenance. Several key features help identify each component:
Appearance
Mold cavities typically exhibit:
Smoother surfaces
Distinct protrusions
Clear recesses
Mold cores often show:
Rougher textures
Visible holes
Cutting marks
These visual cues provide quick identification in most cases.
Structural Elements
Cavity structures include:
Core components feature:
Parting surfaces
Mold sleeves
Ejector pin holes
Weight and Material Differences
| Aspect | Mold Cavity | Mold Core |
| Weight | Generally lighter | Usually heavier |
| Material | Wear-resistant, high-hardness (e.g., mold steel) | Cast iron, steel, alloys |
Material choice impacts durability and performance of each component.
Markings and Identifiers
Manufacturers often use specific markings:
Cavity:
"F" (Fixed side)
"1" (First half)
Core:
"R" (Removable side)
"2" (Second half)
These markings simplify assembly and maintenance processes.
Quality Inspection Methods for Mold Core
Ensuring mold core quality is crucial for producing precise injection molded parts. Follow these steps for accurate inspections:
Preparing the Depth Micrometer
Before use:
Check flexibility of differential cylinder
Ensure smooth movement of differential screw
Verify reliability of locking device
Selecting Measurement Tools
Calibration Process
Use grade 00 platform for cleaning
Clean datum plane and measuring surface
Verify zero position accuracy
Measurement Techniques
For blind holes and deep grooves:
Large Diameter Measurements
When hole diameter exceeds micrometer base:
Employ auxiliary positioning plate
Ensure plate is clean and flat
Take multiple measurements for accuracy
Inspection Checklist
| Step | Action | Importance |
| 1 | Check micrometer functionality | Ensures accurate readings |
| 2 | Select proper measuring rod | Matches inspection needs |
| 3 | Clean and calibrate | Provides reliable zero point |
| 4 | Use careful technique | Prevents damage to tool and part |
| 5 | Adapt for large diameters | Enables accurate measurement of all features |
Maintenance and Troubleshooting
Regular Maintenance Practices
Proper care of mold cores and cavities ensures longevity and quality production.
Cleaning and Lubrication
Remove residue after each production run
Apply appropriate lubricants to moving parts
Use non-abrasive cleaners for sensitive surfaces
Inspection and Repair
Conduct visual checks for wear or damage
Measure critical dimensions regularly
Address minor issues promptly to prevent major failures
Common Issues and Solutions
| Issue | Cause | Solution |
| Wear | Friction during molding | Polish or resurface affected areas |
| Corrosion | Chemical reactions | Apply protective coatings |
| Erosion | High-pressure material flow | Redesign gating system |
| Damage | Mishandling or accidents | Replace damaged components |
Preventive Measures
Extend mold life with these practices:
Use appropriate mold materials
Optimize cooling systems
Implement proper venting
Train operators in correct handling procedures
Mold Life Extension Tips
Monitor cycle times to prevent overuse
Rotate molds for even wear distribution
Store molds properly when not in use
Conclusion
Mold cores and cavities are vital to injection molding. They shape parts, ensure precision, and affect production efficiency. Designers, engineers, and manufacturers should focus on material selection, accurate design, and maintenance.
Manufacturers benefit from regular inspections and proactive troubleshooting. These practices extend mold life and improve production efficiency.


