Geometric Dimensioning and Tolerancing (GD&T) is a critical technology in modern manufacturing to ensure precision and interchangeability of parts. Among the GD&T standards, flatness is one of the most fundamental and widely used form tolerances.
This article provides a comprehensive guide to understanding flatness tolerance in GD&T. It covers the background knowledge, importance, measurement methods, symbology standards, and key considerations for applying flatness tolerances in real-world product design and manufacturing processes. Whether you are a designer, engineer, or manufacturer, this guide will help you grasp this essential concept and implement it correctly.
Introduction to Flatness in GD&T
In the realm of precision engineering and manufacturing, the concept of flatness as defined in Geometric Dimensioning and Tolerancing (GD&T) plays a crucial role in ensuring the quality and functionality of machined parts. This introduction delves into the essentials of GD&T, focusing on the importance of flatness, its measurement techniques, associated challenges, and its practical significance.
Understanding GD&T and Its Importance
Geometric Dimensioning and Tolerancing (GD&T) is a systematic approach to defining and communicating engineering tolerances. It uses specific symbols to describe the size, form, orientation, and location of features on manufactured parts. GD&T is vital for eliminating ambiguity in blueprints and ensuring that parts from different manufacturers fit together perfectly. By providing a clear and standardized method for describing the geometry of parts, GD&T facilitates precision manufacturing, reduces errors, and saves costs associated with misinterpreting drawings.
The application of GD&T principles, including flatness, allows engineers to define more accurately the functional requirements of parts. This precision ensures that components are manufactured within specified tolerances, leading to higher quality products and reduced waste. In essence, understanding GD&T and its implementation is foundational for anyone involved in the design, manufacturing, and inspection of mechanical components.

The Concept of Flatness in GD&T
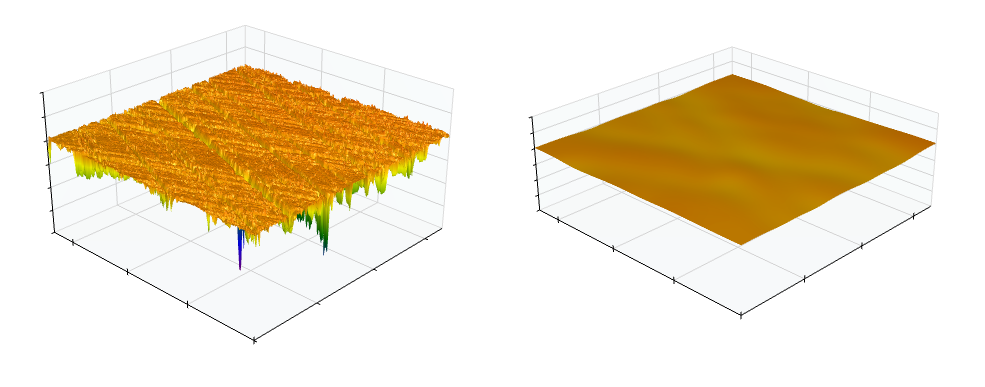
Flatness in GD&T is a form control that specifies how flat a surface must be. It doesn't relate to the part's orientation or size but purely to its flatness. A flat surface is crucial for parts that must mate without gaps or for surfaces that need to be uniformly in contact with another part. For instance, surfaces intended for sealing in automotive or aerospace industries must meet stringent flatness specifications to prevent leaks and ensure safety.
The specification of flatness within GD&T helps avoid the assumption that a perfectly flat surface is required, which can be virtually impossible or highly costly to achieve. Instead, it offers a practical degree of flatness that suffices for the part's intended function. This balance between ideal and achievable flatness underscores the practicality embedded in GD&T principles.
Overview of Flatness Measurement Techniques
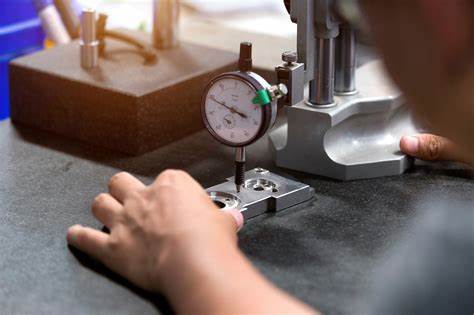
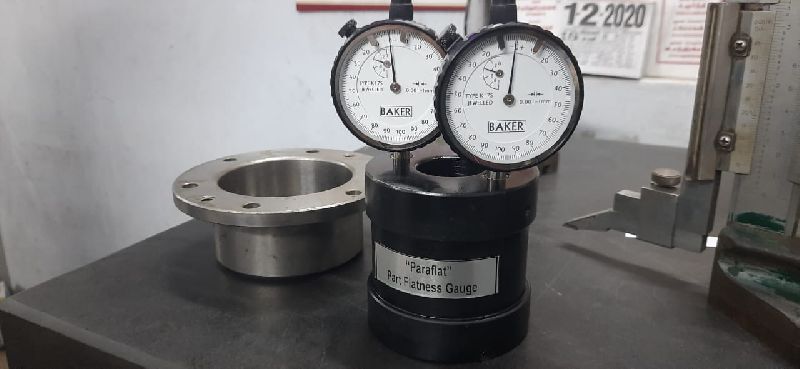
Measuring the flatness of a surface involves several sophisticated techniques ranging from manual inspection tools to advanced metrology equipment. Simple tools like straight edges and feeler gauges can provide a quick indication of flatness but lack precision for tighter tolerances. Coordinate Measuring Machines (CMMs) offer higher accuracy by touching multiple points on the surface and calculating the variation from a flat plane.
Laser scanning and optical flatness testers represent the cutting edge in flatness measurement, providing detailed topographical data and pinpointing deviations with exceptional accuracy. These technologies enable manufacturers to ensure that parts meet their designed specifications and function as intended in their final application.
Challenges in Accurately Measuring Flatness
Achieving accurate flatness measurements can be fraught with challenges. Environmental conditions such as temperature variations can significantly affect measurement outcomes since materials expand and contract with temperature changes. The complexity of the part's geometry may also restrict access to certain surfaces, complicating the measurement process.
Moreover, the resolution and accuracy of the measuring instrument itself can impact the reliability of flatness measurements. Ensuring that the measuring tools are calibrated and maintained correctly is crucial for capturing precise measurements. These challenges necessitate a thorough understanding of both measurement principles and equipment capabilities.

Practical Importance of Flatness Measurement
The practical significance of measuring flatness cannot be overstated. In sectors like aerospace, automotive, and precision engineering, the flatness of surfaces can be directly correlated to the performance and reliability of a system. For example, the flatness of an engine block surface impacts the effectiveness of the seal and, consequently, the engine's overall functionality.
Moreover, measuring flatness and adhering to specified tolerances can lead to significant cost savings by reducing material waste, minimizing rework, and preventing assembly issues. It ensures that parts fit together as intended, enhancing the system's overall reliability and longevity.
Fundamentals of Flatness Tolerance
In the meticulous field of precision engineering, the concept of flatness tolerance plays a pivotal role. Embedded within the framework of Geometric Dimensioning and Tolerancing (GD&T), understanding flatness tolerance is essential for ensuring the quality and functionality of machined parts. This comprehensive guide breaks down the fundamentals of flatness tolerance, making it accessible and understandable.
Definition and Significance of Flatness Tolerance
Flatness tolerance is a type of geometric control within GD&T that specifies the allowable deviation of a surface from being perfectly flat. It is crucial in applications where surfaces must mate perfectly for functional or aesthetic reasons. A flat surface ensures that mechanical parts fit together precisely, reducing wear and potential failure in mechanical systems.
The significance of flatness tolerance extends beyond mere mechanical fit; it also impacts the performance and longevity of the assembled product. In industries such as aerospace and automotive manufacturing, flatness tolerances are meticulously maintained to avoid any potential malfunction, which could have dire consequences.
Ensuring adherence to specified flatness tolerances helps in achieving uniformity and interchangeability of parts. It allows for more predictable manufacturing outcomes and reduces the need for extensive post-production adjustments, ultimately saving time and resources.

Flatness Tolerance Zone: Concept and Visualization
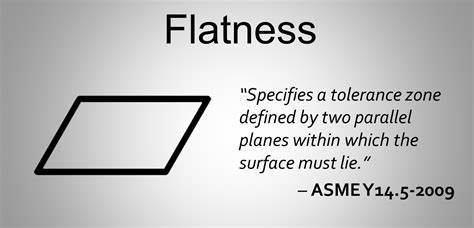
The flatness tolerance zone can be conceptualized as two parallel planes within which the entire specified surface must lie. These planes dictate the maximum and minimum limits of flatness deviation permitted for the surface, essentially framing a three-dimensional space that serves as a boundary for acceptable flatness.
Visualizing the flatness tolerance zone is key to understanding how a surface's flatness is assessed. The distance between the two parallel planes represents the degree of flatness tolerance specified for the part, guiding inspectors and machinists in evaluating the part's compliance with design specifications.
Considering the importance of this visualization, engineering drawings often accompany flatness specifications with detailed diagrams or digital models. This aids in mitigating misunderstandings and ensures a unified vision among those involved in the manufacturing process.
Interpreting Flatness Callouts and Symbols
Interpreting flatness callouts and symbols correctly is foundational for manufacturing parts that meet specified criteria. The flatness symbol, represented by a straight line within a feature control frame (FCF), communicates the necessity for the surface to adhere to the flatness tolerance detailed.
The numerical value following the flatness symbol in the FCF indicates the maximum acceptable deviation of the surface from being perfectly flat. Mastering the interpretation of these callouts is critical for designers, engineers, and machinists alike to ensure that each component meets the intended quality standards.
Education and training on interpreting GD&T symbols, including those for flatness, are crucial in the field. Workshops, courses, and on-the-job training reinforce this essential skill, ensuring that technical drawings are universally understood and correctly implemented.
The Role of Feature Control Frame (FCF)
The Feature Control Frame (FCF) plays a crucial role in the communication and application of GD&T principles, including flatness tolerance. This rectangular box contains all the necessary information to specify a geometric control on a part's feature, succinctly communicating the type of tolerance, the extent of the tolerance, and any relevant references.
The FCF for flatness anchors the tolerance symbol, the numerical value specifying the tolerance limit, and occasionally, datum references, if necessary for defining the tolerance zone. This structured approach to annotation demystifies the requirements for achieving desired part geometry.
Understanding the role and interpretation of the FCF is indispensable for anyone involved in the design, production, and inspection of mechanical parts. It streamlines manufacturing processes and ensures that high precision standards are uniformly met across the industry.
Traditional Flatness Measurement Methods
In the detailed realm of Geometric Dimensioning and Tolerancing (GD&T), understanding and measuring surface flatness is crucial for manufacturing precision components. Traditional methods, like the Height Gage Method, have provided foundational techniques for assessing this critical feature. Here, we'll delve into this method, highlighting its usage, advantages, limitations, and common pitfalls associated with traditional flatness measurement methods.
Introduction to Height Gage Method
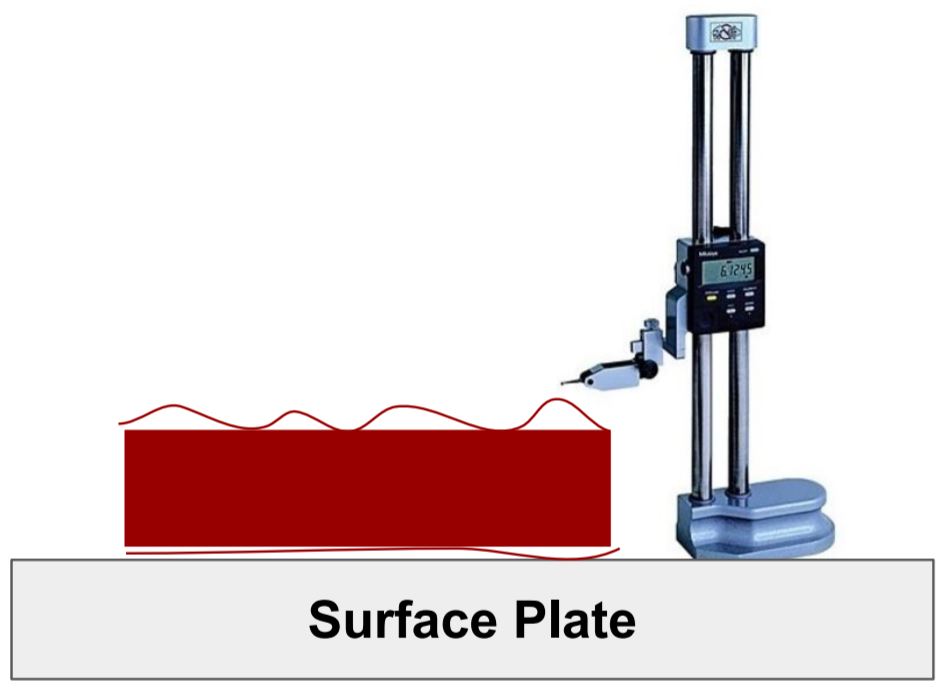
The Height Gage Method is one of the oldest techniques employed in measuring the flatness of surfaces. This method utilizes a height gage, a precise measuring tool that slides over the reference plane (usually a granite surface plate) to determine the vertical distance to various points on the tested surface. By systematically moving the height gage across the part, it's possible to identify deviations from the desired flatness, marking high and low spots against a known reference plane.
Despite its simplicity, the Height Gage Method requires a careful approach. The operator must ensure consistent contact between the gage's scribing tip and the surface. Moreover, careful planning of the measurement points across the surface is necessary to ensure comprehensive coverage and accurate assessment of the part's flatness.
Using Height Gages with Adjustable Columns
Recent advancements have introduced height gages with adjustable columns, making the process more versatile and suitable for various applications. These adjustable columns allow the height gage to accommodate larger parts and reach different areas of the surface without sacrificing stability or accuracy. This adaptability is particularly useful in complex geometries where traditional fixed-column height gages might struggle to provide reliable measurements.

The operator can precisely adjust the column's height to ensure optimal positioning of the measuring tip, facilitating accurate readings even in challenging measurement scenarios. This adjustment capability also means that one tool can be used across a broader range of parts, enhancing the tool's utility and cost-effectiveness in the manufacturing environment.
Advantages and Limitations of Height Gage Technique
One of the primary advantages of the Height Gage Technique is its accessibility; the tool is straightforward to use and does not necessarily require advanced training. It provides quick, tactile feedback on the part's surface flatness, making it an invaluable tool for on-the-spot assessments. Additionally, being one of the more cost-effective measurement methods, it's an attractive option for smaller workshops and applications where high precision is not critical.
However, this technique comes with its share of limitations. Its accuracy heavily relies on the operator's skill and the meticulousness of the measurement process. Moreover, it's less effective over large or complex surfaces, where achieving uniform contact between the measuring tip and the surface becomes challenging.
Common Pitfalls in Traditional Methods
Common pitfalls in traditional flatness measurement methods, including the Height Gage Technique, often stem from human error. Inconsistencies in measurement can occur due to incorrect placement of the tool, varying pressure applied by the operator, or improper interpretation of the results. Additionally, environmental factors such as temperature fluctuations can significantly influence the accuracy of measurements, affecting both the tool and the component.
Another challenge is the equipment's calibration and maintenance. A height gage that is not regularly calibrated can lead to erroneous measurements, misleading the assessment of a component's flatness. Recognizing and mitigating these pitfalls are essential for ensuring that traditional measurement methods continue to provide value in modern manufacturing processes.
Advanced Digital Flatness Measurement
In the realm of precision manufacturing and engineering, the measurement of flatness has undergone a revolutionary shift from reliance on traditional methods to the adoption of advanced digital techniques. This transformation has not only enhanced accuracy but also streamlined the measurement process, making it more efficient and less prone to errors.

Transition from Traditional to Digital Methods
The transition from traditional to digital methods for measuring flatness marks a significant advancement in the field of geometric dimensioning and tolerancing (GD&T). Traditional methods, while valuable for their time, often involved manual tools that required meticulous operation and were subject to human error. In contrast, digital methods leverage cutting-edge technology, such as laser scanning and digital probes, to capture high-precision data points across a surface in a fraction of the time.
Digital measurement tools offer the added advantage of integrating with software to analyze data in ways that were previously impossible or highly time-consuming. This integration allows for instant feedback and comprehensive analysis, enabling operators and engineers to make informed decisions quickly. Furthermore, digital records facilitate easier data sharing and storage, enhancing collaboration among teams.
Best Fit (RMS Plane) Method
One prominent digital method is the Best Fit (RMS Plane) Method, which involves calculating a reference plane that best fits the collected data points from the surface being measured. RMS stands for Root Mean Square, a statistical measure used in this method to minimize the deviations of the surface points from the plane, essentially finding the 'average' plane that represents the surface most accurately.
This method is particularly useful for surfaces where the overall form is more important than the extreme high or low points. It gives a comprehensive picture of the surface flatness, taking into account all measured points equally and providing an optimal fit that represents the average form of the surface.
Minimum Zone Method
In contrast, the Minimum Zone Method focuses on finding the two parallel planes (a zone) that constrain all the data points with the minimum distance between them. This method identifies the absolute minimum and maximum points on the surface and calculates the tightest possible tolerance zone that encompasses all points. It is highly effective for applications where the extremes of surface deviation are critical to the part's functionality.
The Minimum Zone Method offers a stringent assessment of flatness, emphasizing the worst-case scenario for the surface's flatness. This makes it ideal for high-precision applications, where even minor deviations could significantly impact performance or assembly.
Comparing Best Fit vs. Minimum Zone Methods
Comparing the Best Fit (RMS Plane) Method to the Minimum Zone Method reveals distinct advantages and considerations for each. The Best Fit method provides a generalized overview of the surface's form, suitable for applications where an average deviation is more relevant than extreme outliers. Its comprehensive approach makes it versatile for a wide range of applications, offering an equitable assessment of surface form.
Conversely, the Minimum Zone Method's focus on the tightest possible tolerance zone offers a rigorous evaluation of flatness, crucial for precision engineering tasks where the highest degree of accuracy is required. However, this method can sometimes be overly stringent, highlighting extreme deviations that may not impact the part's overall functionality.
In choosing between these methods, engineers must consider the specific requirements of their application, balancing the need for general form accuracy with the necessity of capturing extreme deviations. Both methods represent significant advancements in flatness measurement, enabled by the advent of digital technologies in the field of GD&T.
Practical Strategies for Flatness Evaluation
Venturing into the realm of dimensional metrology, specifically the measurement of flatness in components and materials, requires a strategic approach. This section of the guide explores practical strategies for evaluating flatness, emphasizing the selection of the appropriate measurement method, the integration of technology, guideline adherence, and a glimpse into future technological advancements.
Choosing the Right Measurement Method
The choice of measurement method plays a pivotal role in accurately determining flatness. The decision largely depends on the part's complexity, the precision required, and the specific application. Traditional tools, such as feeler gauges and straight edges, might suffice for simpler applications where high precision is not critical. However, for more complex and demanding scenarios, advanced digital methods, including laser scanning and Coordinate Measuring Machines (CMMs), provide the needed accuracy and efficiency.
When selecting a method, consider factors like measurement range, accessibility of the surface, data analysis requirements, and the environment in which measurements will be taken. It's also essential to evaluate the cost-benefit ratio, as more sophisticated methods tend to be more expensive but offer greater precision and faster data collection.
Integrating Technology in Flatness Verification
Technology integration has revolutionized flatness verification, making it simpler, faster, and more accurate. Digital tools and software not only facilitate precise measurement across vast surfaces but also allow for the collection of a comprehensive set of data points that can be analyzed to gain insights into the manufacturing process and product quality.
Software plays a crucial role in interpreting this data, offering visualization tools that help understand the surface's flatness and identify problem areas quickly. Moreover, the ability to store and compare data over time enables continuous improvement in manufacturing processes and product consistency.
Guidelines for Optimal Flatness Measurement
Adhering to established guidelines for flatness measurement ensures consistent, accurate results. It’s important to calibrate and maintain measurement tools to avoid inaccuracies. When using digital methods, ensure that the software and hardware are updated and that data is accurately captured and analyzed. Additionally, environmental factors such as temperature and humidity should be controlled or accounted for during measurement, as they can affect both the part being measured and the measurement equipment.
Training for personnel is another critical factor. Operators should be skilled not only in using the tools but also in interpreting the data collected. Comprehensive guidelines that cover preparation, execution, and analysis stages of flatness measurement can significantly enhance the reliability of the results.

Future Trends in Flatness Measurement Technology
Looking ahead, future trends in flatness measurement technology are likely to emphasize automation, integration, and accuracy. The development of autonomous measurement systems equipped with AI and machine learning algorithms promises to further simplify flatness verification, making it possible to automatically detect and analyze deviations in real-time.
The integration of flatness measurement systems into manufacturing lines could enable instant corrections and adjustments, reducing waste and improving efficiency. Moreover, advancements in sensor technology and data processing are expected to increase precision, allowing for the detection of even the most minute deviations.
3D imaging and virtual reality technologies also hold the potential to enhance flatness measurements, providing intuitive, detailed visualizations of surface topology and facilitating remote inspection and analysis capabilities.
Flatness vs. Other GD&T Parameters
Exploring the multifaceted world of Geometric Dimensioning and Tolerancing (GD&T) reveals the nuanced differences between various parameters, such as flatness, straightness, profile of a surface, parallelism, and perpendicularity. Understanding these distinctions and their appropriate applications is crucial for achieving precision in manufacturing and engineering.
Flatness vs. Straightness
Flatness and straightness are two critical but distinct GD&T parameters. Flatness concerns the overall surface, ensuring that all points on a specified surface lie between two parallel planes. It’s applied to a surface as a whole, emphasizing uniformity without reference to any datum.
Straightness, on the other hand, typically applies to individual lines or axes, ensuring that a feature does not deviate from a perfectly straight path. It can be used to control the form of a line on a surface or the axis of a cylindrical part, emphasizing linear conformity.
While flatness ensures a surface's overall uniformity, straightness focuses on the linearity of specific elements. The choice between the two depends on the part's design requirements and how it fits or functions within an assembly.
Flatness vs. Profile of a Surface
Flatness and profile of a surface are often confused due to their surface-related definitions in GD&T. However, while flatness specifies how close a surface is to being perfectly flat, profile of a surface defines a more complex form. Profile of a surface encompasses not only flatness but also the curves and contours, allowing for more intricate detailing of the surface’s geometry.
The profile of a surface is versatile, controlling the outline of any feature or array of features. This makes it ideal for parts with sophisticated designs, where both flat areas and curves must adhere to precise specifications.
In contrast, flatness is simpler and more specific, focusing solely on the evenness of the surface without accounting for any intended curvature. This makes flatness ideal for surfaces where uniform contact or seal integrity is critical.
Flatness vs. Parallelism and Perpendicularity
Flatness contrasts with parallelism and perpendicularity by focusing solely on a surface's evenness without considering its relation to other features or planes. Parallelism ensures that a surface or line is parallel to a datum plane or axis, while perpendicularity ensures a feature's 90-degree alignment to a datum.
Parallelism and perpendicularity are relational measurements, dependent on a datum to define their geometric tolerance. They ensure that additional parts or features align correctly with the primary reference. Flatness, devoid of such relational constraints, ensures a surface's uniformity independently of other features.
Choosing between these parameters hinges on the part's functional requirements and how it interacts with other components in an assembly. While flatness ensures a surface's uniformity, parallelism and perpendicularity align features in relation to each other, ensuring assembly cohesiveness and operational precision.
When to Apply Each Parameter
Deciding when to apply each GD&T parameter demands a thorough understanding of the part’s design requirements and functionality within its assembly. Flatness is essential for surfaces that require uniformity for aesthetic or functional reasons, such as sealing surfaces. Straightness is critical for features needing to maintain a linear path, like shafts or guide rails.
Profile of a surface is suited for complex surfaces with specific geometrical requirements beyond mere flatness or straightness. Meanwhile, parallelism and perpendicularity are indispensable when precise alignment between features or with a datum is required for mechanical assembly or operational functionality.
Applying Flatness in Real-World Scenarios
In the precise and demanding world of manufacturing, the application of flatness as outlined in Geometric Dimensioning and Tolerancing (GD&T) plays a pivotal role. This guide delves into how flatness is applied in real-world scenarios, particularly in automotive component manufacturing and aerospace parts, supplemented by insightful case studies and lessons learned from field examples.
Flatness in Automotive Component Manufacturing
In the automotive industry, the requirement for flatness in component manufacturing cannot be overstated. Critical parts like engine block surfaces, brake rotor surfaces, and various gasket interfaces demand high levels of flatness to ensure proper assembly, function, and reliability. A deviation from specified flatness can lead to improper sealing, resulting in leaks, increased wear, or even catastrophic engine failure.
Manufacturers employ advanced measurement equipment, such as Coordinate Measuring Machines (CMMs), to verify the flatness of these components. These tools enable precise mapping of a surface, identifying any deviations from the ideal flatness required. The data collected is analyzed and used to adjust manufacturing processes, ensuring each part meets stringent quality standards.
Moreover, the automotive industry benefits from continuous innovation in flatness measurement technologies, adopting laser scanning and optical methods for faster, more accurate assessments. This proactive approach to ensuring flatness helps in reducing waste, enhancing the efficiency of assembly lines, and maintaining high customer satisfaction by delivering reliable vehicles.
Flatness Measurement for Aerospace Parts
In aerospace manufacturing, flatness takes on an even greater importance given the high-stakes environment in which these parts operate. Components such as turbine blades, fuselage panels, and landing gear parts require precise flatness to perform optimally at high speeds and under extreme conditions. Any deviation can significantly impact the safety, performance, and fuel efficiency of the aircraft.
Given these critical requirements, aerospace manufacturers leverage sophisticated flatness measurement systems that provide comprehensive surface analysis. This ensures that even the slightest deviation is identified and corrected before assembly. The industry's stringent standards necessitate rigorous quality control processes, where flatness measurement is integral.
The quest for lighter, stronger materials in aerospace also complicates flatness measurement. As manufacturers experiment with advanced composites, ensuring these new materials meet flatness criteria poses unique challenges, driving further advancements in measurement techniques and equipment.
Case Studies: Industrial Applications and Challenges
Case studies from both the automotive and aerospace sectors highlight the significance of flatness in industrial applications. For instance, a case involving the manufacturing of high-performance engine blocks revealed that improving flatness in the mating surfaces significantly enhanced engine efficiency and durability. This required a reevaluation of machining processes and the integration of advanced measurement techniques.
Another case in aerospace involved the fabrication of composite wing panels. Achieving the required flatness was challenging due to the composite materials' propensity to warp during curing. Through meticulous process optimization and the adoption of real-time flatness monitoring, manufacturers were able to maintain the required tolerances, underscoring the adaptability needed in applying flatness criteria.

Lessons Learned from Field Examples
Lessons learned from these real-world applications underscore the dynamic nature of applying GD&T principles, such as flatness, across industries. Key takeaways include the necessity for continuous improvement in measurement technologies, the importance of integrating data analysis into the manufacturing process, and the need for flexibility in addressing the unique challenges presented by new materials and designs.
Moreover, these examples highlight the collaborative effort required between design engineers, machinists, and quality control professionals to ensure the final product meets all specifications. It's clear that through innovation, precision, and adherence to standards, challenges related to maintaining flatness in critical components can be successfully navigated.
Standards, Specifications and Best Practices
In the rigorous and detailed field of Geometric Dimensioning and Tolerancing (GD&T), adherence to standards, precise specification setting, and the implementation of best practices are fundamental. This guide delves into the GD&T standards governing flatness, the nuances in specifying flatness, the significance of meticulously prepared engineering drawings, and the collaborative efforts between designers and manufacturers to ensure top-notch quality control.
Overview of Relevant GD&T Standards (ASME, ISO)
GD&T standards primarily include those set forth by the American Society of Mechanical Engineers (ASME) and the International Organization for Standardization (ISO). ASME's Y14.5 and ISO's 1101 are comprehensive guides that detail the symbols, definitions, and rules used in GD&T, including those concerning flatness. While both serve the same purpose, there are minute differences that can impact global collaboration, making it crucial for engineers and designers to be versed in both to ensure compliance and interoperability.
The ASME standards tend to be more commonly adopted in North America, offering detailed guidance on the application of GD&T principles, including flatness. ISO standards, on the other hand, are widely accepted internationally and may differ slightly in symbols or tolerance definitions. Understanding these standards is vital for ensuring that designs can be accurately manufactured and interpreted worldwide.
Compliance with these standards ensures that parts meet the highest levels of quality and functionality. Regular updates to both ASME and ISO reflect advancements in manufacturing capabilities and measurement technologies, maintaining their relevance in the evolving engineering landscape.
Setting Accurate Flatness Specifications
Setting accurate flatness specifications is more than just citing a standard; it requires a comprehensive understanding of the part’s function, mating components, and the manufacturing process. Engineers must consider the end use of the part to determine the level of flatness required, balancing ideal conditions with manufacturing realities. For instance, a surface that mates with a sealing component may require stricter flatness tolerances than a non-critical cosmetic surface.
Specifications should be clearly defined in the engineering drawings, unambiguously stating the flatness tolerance required. Additionally, understanding the capabilities of manufacturing processes and measurement methods can guide realistic and achievable tolerance settings. This precision in specification helps avoid over-engineering parts, reducing unnecessary costs while ensuring part functionality.
Collaboration between design teams and manufacturing experts is crucial in this phase. Direct communication can highlight any potential manufacturing challenges and adjust specifications accordingly, ensuring that the design is both optimal and manufacturable.
Best Practices for Engineering Drawings
Engineering drawings are the bridge between design intent and manufactured reality. Implementing best practices for these drawings is essential for clear communication and efficient molding and CNC machining. Drawings should include comprehensive information on all GD&T features, including flatness, using standardized symbols and annotations as defined by ASME or ISO. Clarity and precision in these drawings prevent misinterpretation and manufacturing errors.
Annotations regarding flatness should be accompanied by relevant datum references when necessary, providing a clear basis for measurement. Including notes or supplemental information on the rationale behind certain specifications can also aid manufacturers in understanding the design intent, facilitating a smoother production process.
Regular training and updates for design and manufacturing teams on the latest standards and software tools for creating and interpreting drawings ensure consistency and accuracy, maintaining high-quality outputs across projects.
Partnering with Manufacturers for Quality Control
In the realm of GD&T, partnering with manufacturers early in the design process is a strategic approach to ensuring quality control. Such partnerships enable the sharing of expertise, where manufacturers can offer insights into the achievability of specified tolerances, including flatness, and suggest adjustments based on manufacturing capabilities and measurement techniques.
This collaboration fosters a proactive quality control environment, where potential issues are identified and addressed before production, reducing waste and rework. Moreover, manufacturers equipped with state-of-the-art measurement tools can provide valuable feedback on part conformance to specifications, contributing to continuous improvement in design and manufacturing processes.
Manufacturers who are involved in the design phase and are informed about the part's critical functions are better positioned to maintain stringent quality control, ensuring that the final product meets the designed specifications and functional requirements.
FAQs
Q: What is the difference between flatness and straightness?
A: Flatness applies to surfaces; straightness to lines or axes. Flatness ensures a surface's uniformity; straightness ensures linearity. Each serves different dimensional control purposes.
Q: How is the flatness tolerance zone determined?
A: Defined by two parallel planes. The distance between these planes represents tolerance. All surface points must lie within these planes.
Q: Can flatness be applied to curved surfaces?
A: Yes, flatness can apply if assessing the surface deviation. It focuses on surface regions rather than overall curvature. Flatness ensures uniformity in specified sections.
Q: What are the advantages of using an optical CMM for flatness measurement?
A: High precision and efficiency. Capable of complex surface mapping. Provides detailed digital output for analysis.
Q: How do I interpret a flatness callout on an engineering drawing?
A: Identify the flatness symbol within the feature control frame. Note the numeric tolerance value. Apply the specified tolerance to the designated surface.
Q: What are the standard practices for applying flatness in GD&T?
A: Use standardized symbols and annotations. Clearly define flatness specifications. Ensure the drawing adheres to ASME or ISO standards.
Q: How can flatness be used to control tolerance stacks?
A: By ensuring mating surfaces are flat. Minimizes accumulation of tolerances in assemblies. Improves part fit and function.
Q: Is a reference datum necessary for flatness control?
A: No, flatness does not require a datum. It's independently assessed on the specified surface. Datums are used for other types of geometric controls.
Q: How does flatness tolerance affect part functionality?
A: Ensures mating surfaces align properly. Prevents assembly issues and operational malfunctions. Critical for seals and interfaces.


