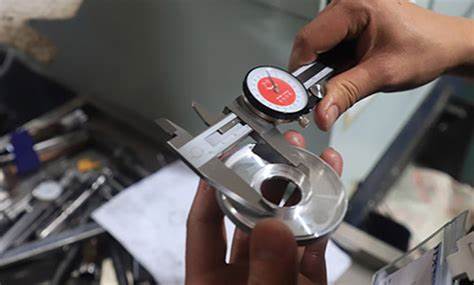
No matter what product you produce, standard machining tolerances are important parameters to consider. Today, most consumer products require consistency on a microscopic scale.
Therefore, manufacturers often scrutinize and compare different types of manufacturing processes, and machining tolerances remain an important factor. To understand machining tolerances for different processes, it is important to understand what machining tolerances are, how to measure them, and what different types of tolerances there are.

This article will cover all this information and more. Finally, there are some tips to help you improve machining tolerances in your industry.
What are CNC Machining Tolerances?
Definition and Concept of CNC Machining Tolerances
CNC machining tolerances define the allowable variation in a part's dimensions, ensuring the necessary precision in manufacturing. These tolerances are vital because they set the acceptable range within which a part's actual dimensions can differ from its nominal or intended dimensions. For instance, a component designated to have a dimension of 3.0” with a ±0.001” tolerance must measure between 2.999” and 3.001” to meet quality standards. The essence of machining tolerances lies in their ability to balance accuracy with manufacturing feasibility, shaping the fundamental relationship between theoretical designs and practical outcomes in CNC machining.
Explanation of Permissible Variations
Tolerances reflect a part's permissible variations, distinguishing between tight and loose tolerances. Tight tolerances (smaller variations) signify a higher demand for precision, affecting the manufacturing process's complexity and cost due to additional setups, longer cycle times, and the need for specialized tools. Conversely, loose tolerances allow for greater variance, indicating less stringent precision requirements, which can simplify production and reduce costs.
Relationship to Blueprint Values
Machining tolerances are directly tied to blueprint values, serving as a crucial link between a part's theoretical design and its real-world application. They ensure that components can fit and function together as intended, despite the inherent variability in manufacturing processes. This relationship underscores the tolerances' role in guiding CNC machining towards producing parts that adhere closely to their design specifications.
Importance in Manufacturing Precision Parts
In the world of CNC machining, tolerances are not mere numbers but are essential for guaranteeing the form, fit, and function of parts. They rule out a margin of error, ensuring that components meet their purpose in an assembly, and play a significant role in managing the manufacturing cost by setting boundaries for precision requirements.
Symbolism and Representation of Tolerances

Interpretation of Tolerance Symbols
The “±” symbol is commonly used to represent machining tolerances, signaling the range within which part measurements can vary from the specified dimension. This symbolism is central to understanding how closely a part must match its designed dimensions, and it directly influences the final product's quality.
Significance of ± Notation
The ± notation carries profound significance, encapsulating the concept of permissible variation in a concise form. It instantly communicates the precision level required, impacting both the design and manufacturing phases by clarifying the extent of allowable deviation from the nominal size.
Importance of Machining Tolerances
The world of CNC machining is intricate, where every micron counts. Machining tolerances play a pivotal role in transforming a piece of metal into a masterpiece that fits perfectly into its intended place. These tolerances are not just numbers but are the keystones ensuring functionality, economic efficiency, and the aesthetic integrity of the final product.
Enhancing Part Fit and Functionality

Ensuring Compatibility in Assemblies
Imagine assembling a complex machine with parts that don't fit together. It's not only frustrating but renders the effort useless. Precise machining tolerances ensure that every component fits together, like pieces of a puzzle, creating a seamless assembly. This compatibility is crucial for complex machinery where every part must be in perfect harmony with others.
Avoiding Defective Parts Due to Tolerance Deviation
A small deviation in machining tolerances can lead to defective parts, unfit for their purpose. These defects not only waste materials and time but can also jeopardize the entire project. Hence, stringent adherence to tolerances ensures that parts meet their specifications, reducing the likelihood of defects and ensuring optimal performance.
Managing Margin of Error

Understanding Variations in Manufacturing
No two manufacturing processes are identical, and variations are inevitable. Machining tolerances recognize these inherent variations, providing a cushion that allows for minor deviations without compromising the part's functionality. This understanding helps in managing expectations and ensuring that parts meet quality standards.
Minimizing Risk of Product Failure
Parts that deviate from their specifications can lead to product failures, which can have dire consequences, especially in critical applications like aerospace or healthcare. By setting and adhering to specific tolerances, manufacturers can significantly reduce the risk of such failures, ensuring reliability and safety.
Controlling Machining Costs
Impact of Tolerances on Manufacturing Expenses
The tighter the tolerance, the higher the cost. Achieving high precision requires more sophisticated equipment, longer machining times, and specialized skills, all of which add to the manufacturing expenses. By carefully determining the necessary level of precision, manufacturers can balance between achieving the desired quality and keeping costs under control.
Balancing Precision and Economic Efficiency
Finding the sweet spot between precision and cost-efficiency is key. Not every part needs to be machined with tight tolerances. Understanding which parts require high precision and which do not can significantly optimize manufacturing costs without compromising on quality.
Ensuring Aesthetic and Functional Integrity
Role of Tolerances in Final Product Appearance
The final appearance of a product is not only about aesthetics but also about functionality. Parts that fit together perfectly not only look better but also function more efficiently. Properly applied tolerances ensure that the final product not only meets the design specifications but also looks and performs as intended.
Meeting Design Specifications for Optimal Performance
The ultimate goal of adhering to machining tolerances is to meet the design specifications, ensuring that the final product operates at optimal performance. This alignment between design and manufacturing is what turns a concept into a reality that meets, or even exceeds, performance expectations.
Types of Tolerances Used in CNC Machining

Standard Tolerances in CNC Machining
Navigating the world of CNC machining requires understanding the blueprint of precision: standard tolerances. These numerical values are more than mere guidelines—they are the boundaries within which the art of precision takes form. This section unfolds the fabric of standard tolerances and the international standards sculpting them.
Overview of Commonly Adopted Tolerance Levels
Standard tolerances are the set rules of the game in CNC machining. They tell us how close a part's actual measurements can be to its intended dimensions. For instance, a standard tolerance might say a part could be 0.005 inches (or about 0.13mm) smaller or larger than its design specifies, and it would still be considered perfectly made. This range ensures parts fit together well without being too loose or too tight.
Fact: Most machines operate within a specific range of tolerances, with CNC milling machines typically maintaining about +/- 0.1mm precision for standard projects. This shows that while every micron counts, there is room for slight, acceptable variations that do not compromise the part's functionality.
International Standards and Guidelines
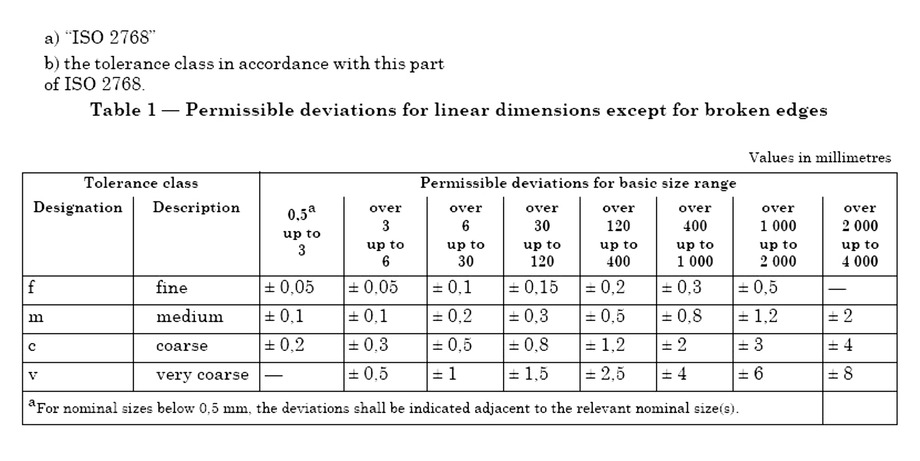
In the realm of machining, consistency is key—not just in one workshop, but globally. This consistency is maintained through international standards and guidelines, which serve as a universal language for quality and precision in manufacturing. Agencies such as the American Society of Mechanical Engineers (ASME), the International Organization for Standardization (ISO), and the American National Standards Institute (ANSI) are the custodians of tolerance standards. They define what is acceptable and what is not, ensuring that a component made in one part of the world fits perfectly with another made thousands of miles away.
● ISO 2768 and ASME Y14.5 are examples of such standards that provide frameworks for tolerances, dictating how tight or loose the manufacturing process needs to be to achieve desired quality levels.
Limit Tolerances in CNC Machining
Understanding tolerances is crucial in CNC machining, and among the various types, limit tolerances hold a special place. This section dives into what limit tolerances are and how they play a pivotal role in CNC machining, ensuring every piece meets the highest standards of precision and functionality.

Definition and Application in CNC Machining
Limit tolerances define the strict upper and lower bounds within which a part's dimensions must fall to be considered acceptable. It's a straightforward way of saying, "This part's size should be between this small and this big, no more, no less." In the complex world of CNC machining, where precision is king, understanding and applying limit tolerances ensure that parts fit perfectly, function as intended, and meet the stringent demands of industries such as aerospace, automotive, and medical devices.
For instance, a CNC machined part with a dimension specified as 15mm with a tolerance limit of +/- 0.5mm must measure between 14.5mm and 15.5mm. This clarity simplifies quality control processes, allowing for quick and accurate assessment of parts.
Setting Range Values for Acceptable Variations
Setting range values for acceptable variations is more than just drawing lines; it's about defining a space within which perfection lives. These range values are not arbitrary but are meticulously calculated to balance the part's functionality with manufacturability. Engineers and designers work hand-in-hand to establish these values, taking into account factors such as material properties, intended use, and the potential impact of environmental conditions.
Fact: The process of setting limit tolerances involves not only understanding the end use of the part but also the capabilities of the CNC machining equipment. This dual consideration ensures that the set tolerances are realistic, achievable, and cost-effective, making sure that quality never dips while keeping expenses in check.
Case Study: Consider a high-precision component used in a satellite's navigation system. The limit tolerances for this part are set with incredibly narrow range values, ensuring that even the slightest deviation could compromise the satellite's functionality. Through rigorous testing and precise machining, the final part meets these stringent tolerances, showcasing the crucial role of limit tolerances in mission-critical applications.
Unilateral and Bilateral Tolerances in CNC Machining
Precision in CNC machining does not merely reside in hitting exact measurements but also in understanding the flexible boundaries within which parts can operate. Among the nuances of machining tolerances, unilateral and bilateral tolerances present a sophisticated approach to managing dimensional variations. These concepts ensure that parts adhere to the rigorous demands of functionality and fit, crucial in industries where precision is non-negotiable.

Understanding Directional Variations in Tolerances
Unilateral tolerances specify that variations from the nominal size can occur in one direction—either positive or negative, but not both. This means a part can either be smaller or larger than the intended size, but there's a strict boundary on one side.
Contrastingly, bilateral tolerances allow for variations in both directions, granting a part the leeway to be either slightly smaller or larger than the nominal dimension. This dual flexibility offers a middle ground, where manufacturing variances are accommodated, ensuring a part still fits where it should.
Practical Examples and Applications
To illustrate these concepts, let's delve into some examples:
● Unilateral Tolerance Example: Imagine manufacturing a shaft meant to fit into a hole. If the shaft's diameter is given a unilateral tolerance of +0.00mm/-0.02mm, it could be up to 0.02mm smaller but not any larger than the specified size. This ensures a snug fit, eliminating the risk of the shaft being too large to fit into its designated hole.
● Bilateral Tolerance Example: Consider the example of a decorative panel that must fit into a frame. Given a bilateral tolerance of +/- 0.05mm, the panel can be 0.05mm thinner or thicker than the nominal dimension. This versatility ensures the panel fits adequately within the frame while allowing for slight variances in material expansion or contraction.
Fact: The choice between unilateral and bilateral tolerances hinges on the part's final application and how it interacts with other components. In unilateral tolerances, the aim is often to prevent interference fits, while bilateral tolerances provide a cushion for easier assembly or operational flexibility.
Case Study: In the aerospace industry, where the margin for error is almost non-existent, unilateral tolerances are frequently utilized for engine components. These parts must fit perfectly within a tightly defined space, supporting optimal engine performance under extreme conditions. An aerospace component, such as a turbine blade, might feature unilateral tolerances to ensure it can only be smaller, never larger, than its designated slot, avoiding catastrophic operational failures.
Geometric Dimensioning and Tolerancing (GD&T)
In the precision-driven world of CNC machining, Geometric Dimensioning and Tolerancing (GD&T) plays a crucial role. This system not only standardizes the engineering drawings but also brings a nuanced understanding of how parts fit and function in the real world. Let's embark on an exploration of GD&T and its significance in translating design visions into tangible, functional components.
Overview of GD&T
GD&T is a symbolic language used on engineering drawings and computer-generated three-dimensional models for CNC machining parts. It provides comprehensive information about the shape, size, and tolerances of a part, offering a clear, standardized means to communicate complex geometric specifications between engineers and manufacturers. By using GD&T, manufacturers can understand the designer's intent, ensuring that parts meet the highest levels of accuracy and functionality.
Types of GD&T Tolerances
GD&T defines various types of tolerances, each addressing different aspects of a part's geometry:
● Form Tolerances: These determine the shape accuracy of a single feature without regard to its orientation or location to other features. Examples include flatness, straightness, circularity, and cylindricity.
● Profile Tolerances: This category controls the outline or surface of a feature, ensuring it adheres to a specific shape within a defined tolerance zone. Profile tolerances can apply to a line (profile of a line) or a surface (profile of a surface).
● Orientation Tolerances: Orientation tolerances dictate how features align with one another. Types include parallelism, perpendicularity, and angularity, ensuring parts assemble correctly and function as intended.
● Location Tolerances: These tolerances specify the exact position of features. Common types include position, concentricity, and symmetry, critical for ensuring components fit together precisely.
● Runout: Runout combines elements of location and orientation to ensure that a feature runs true to a datum axis or point when the part is rotated. This tolerance is essential for parts that must remain balanced and stable during operation.
Importance of Proper GD&T Interpretation
Proper interpretation of GD&T symbols and standards is paramount. Misinterpretation can lead to manufacturing errors, resulting in parts that fail to fit or function as intended. Engineers and machinists must be proficient in GD&T to accurately translate design specifications into manufactured components. This requires a deep understanding of the symbols, terms, and concepts outlined in GD&T standards.
Fact: Accurate GD&T application can drastically reduce manufacturing costs and errors by clarifying design intent, eliminating assumptions, and providing clear guidelines for inspection and quality control.
Case Study: Consider a complex aerospace component requiring high precision and reliability. Through the application of GD&T, the engineering team specifies the exact form, orientation, and location tolerances for each critical feature. This precision ensures that the component fits seamlessly within the larger assembly, maintaining the structural integrity and operational efficiency of the aerospace system.
Common CNC Machining Tolerance Standards
Precision in CNC machining is not just a goal; it's a fundamental requirement. The tolerance standards adopted in CNC machining processes play a pivotal role in achieving the desired level of precision. Let’s dive into an overview of standard tolerance values, how they vary across different CNC processes, and their comparison with alternative technologies.
Overview of Standard Tolerance Values
Variations Based on Machining Processes
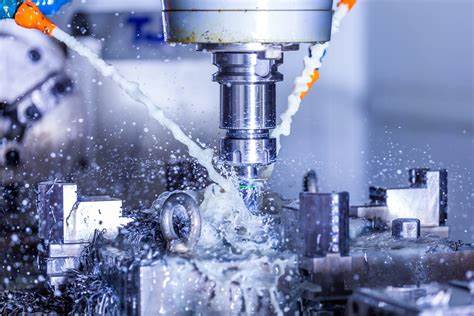
Different CNC machining processes, such as milling, turning, and drilling, come with their own set of standard tolerance values. These standards serve as a guideline for what is attainable under normal circumstances without additional costs for special setups or equipment. For example, standard milling processes might offer tolerances as tight as ± 0.005 inches (about 0.13mm), whereas more refined processes like grinding can achieve tolerances down to ± 0.0002 inches (about 0.005mm).
Comparison with Alternative Technologies
When compared to other manufacturing technologies, CNC machining stands out for its ability to achieve tighter tolerances. Processes like 3D printing or die casting may not consistently reach the same level of precision without post-processing. This makes CNC machining a preferred choice for applications requiring high accuracy and fit precision.
Tolerance Standards Across Different CNC Processes

Specific Tolerance Values for Various Machining Techniques
Here’s a quick rundown of specific tolerance values for various CNC machining techniques:
● Milling (3-axis): ± 0.005 inches (0.13mm)
● Milling (5-axis): ± 0.002 inches (0.05mm)
● Turning: ± 0.003 inches (0.08mm)
● Grinding: ± 0.0002 inches (0.005mm)
These values showcase the potential for precision across different techniques, highlighting the versatility of CNC machining in meeting diverse manufacturing needs.
Impact of Process Complexity on Tolerance Levels
The complexity of the CNC process significantly impacts tolerance levels. Generally, more complex processes like 5-axis milling can achieve tighter tolerances due to their enhanced capability to precisely manipulate the workpiece. However, this increased precision often comes at a cost, both in terms of time and resources, emphasizing the need for a balanced approach to selecting the right machining process based on the part’s requirements.
Understanding Measurement Terminology in CNC Tolerances
Delving into the realm of CNC machining requires a firm grasp of specific measurement terminologies. These terms not only communicate the expected precision but also bridge the gap between design and manufacturing. Let's unravel the meanings behind basic size, actual size, limits, deviations, and the pivotal role of datum in ensuring parts meet their intended specifications.
Basic Size vs. Actual Size
Differentiating Theoretical and Practical Dimensions
● Basic Size refers to the theoretical dimension found in design drawings. It represents the target dimension that manufacturers aim to achieve during machining.
● Actual Size is the dimension a part measures after it has been machined. It’s the real-world representation of the part's size.
Importance of Aligning Basic and Actual Sizes
Aligning basic and actual sizes is crucial for ensuring parts fit together as intended. A significant discrepancy between these sizes can lead to assembly issues, affecting the product's overall functionality and performance. This alignment underscores the importance of achieving precision in manufacturing processes.
Limits and Deviations
Defining Allowable Dimensional Extremes
● Limits set the allowable dimensional extremes for a part, specifying the minimum and maximum acceptable sizes. These limits ensure that parts remain functional even with slight variations from the basic size.
● Deviations represent the difference between the actual size of a part and its basic size, providing a metric for assessing the precision achieved in the manufacturing process.
Calculating Deviations for Precision Analysis
Calculating deviations is essential for precision analysis, helping manufacturers understand how closely they are meeting design specifications. By quantifying deviations, it’s possible to make necessary adjustments to the manufacturing process, ensuring tighter control over part dimensions.
Datum and Its Role in Measurement
Utilizing Reference Points for Precision Assessment
● Datum refers to a reference point, line, or plane used as the basis for dimensional measurements in CNC machining. It acts as an anchor for measurements, enabling precise assessment of part dimensions in relation to design specifications.
Incorporating Datum in Geometric Dimensioning
Incorporating datum points in geometric dimensioning is pivotal. These reference points are essential for ensuring that all measurements are consistent and correlated to the part's intended design. By using datum, manufacturers can ascertain the exactness and alignment of features, further enhancing the precision of CNC machined parts.
Factors Affecting Machining Tolerances
The world of CNC machining is complex, involving a myriad of factors that can influence the final precision of machined parts. Understanding these factors is crucial for achieving the desired tolerances and ensuring the highest quality in manufacturing processes. Let’s explore the key elements that play a role in machining tolerances
Influence of Material Properties
Impact of Material Characteristics on Machining Precision
Different materials respond uniquely to machining processes. Harder materials, such as stainless steel, may resist cutting forces, affecting the final dimensions, while softer materials like aluminum might deform easily. Knowing how material properties influence machining is vital for achieving the intended tolerances.
Strategies for Addressing Material-Related Challenges
Selecting the right machining strategy and tools for specific material types helps in overcoming these challenges. For instance, using specialized cutting tools and adjusting machining parameters like speed and feed rate can mitigate material-related issues.
Role of Machining Processes
Understanding Process Limitations and Capabilities
Every machining process, from milling to turning, has its inherent limitations and capabilities. Understanding these aspects allows for better planning and execution of machining operations, ensuring that the chosen process matches the tolerance requirements of the part.
Optimizing Machining Techniques for Desired Tolerances
Optimization involves choosing the right process and tweaking it to meet specific tolerance goals. For complex parts requiring tight tolerances, a combination of processes may be necessary to achieve the desired results.
Effects of Surface Finishes
Considerations for Post-Machining Treatments
Surface finishes can influence the overall dimensions and tolerances of a part. Processes like sandblasting or anodizing might introduce minor changes in size or surface roughness, affecting how parts fit or function.
Maintaining Dimensional Integrity Through Finishing
Choosing appropriate finishing techniques and carefully controlling their application ensures that the finishing process does not compromise the part's dimensional integrity.
Importance of CNC Cutting Tools
Selection Criteria for Optimal Tool Performance
The right cutting tool selection is paramount for achieving desired tolerances. Tools must be chosen based on material, machining process, and the specific tolerances required, ensuring they can perform under the conditions dictated by the machining parameters.
Mitigating Tool-Related Variations in Tolerances
Regular maintenance and monitoring of tool wear can help mitigate variations in tolerances due to tool degradation. Implementing a rigorous tool management system ensures consistent performance throughout the machining process.
Budget Considerations
Balancing Precision Requirements with Budgetary Constraints
Achieving higher precision often comes at a higher cost. It’s essential to balance the need for tight tolerances with budgetary constraints, focusing on cost-effective strategies that do not compromise quality.
Cost-Effective Strategies for Achieving Desired Tolerances
One strategy is to assign tighter tolerances only to critical features, allowing for more flexibility on less critical dimensions. This approach helps in optimizing manufacturing costs while meeting the part's functional requirements.
Impact of Machinist Skills
Role of Operator Expertise in Tolerance Management
The skill and experience of CNC operators significantly impact the ability to achieve and maintain tight tolerances. Experienced machinists can make subtle adjustments to compensate for variations in material, tools, and processes.
Best Practices for Ensuring Consistent Machining Quality
Continuous training and adherence to best practices, including regular machine calibration and maintenance, are crucial for ensuring consistent machining quality across all operations.
Considerations and Tips for Choosing CNC Machining Tolerances
Navigating the complexities of CNC machining tolerances can be challenging, but with the right considerations and strategies, achieving optimal precision becomes possible. This guide outlines critical factors to consider and tips for selecting machining tolerances, ensuring your projects meet the highest standards of quality and functionality.
Material Selection and Tolerance Specifications
Aligning Material Properties with Tolerance Requirements
Material selection plays a pivotal role in determining achievable tolerances. Different materials behave uniquely under machining processes, influencing the precision of the final part. For instance, metals like aluminum allow for tighter tolerances due to their malleability compared to harder materials like titanium.
Adjusting Tolerances Based on Material Characteristics
Understanding a material's characteristics can inform decisions on adjusting tolerances. Softer materials may require tighter controls to prevent deformation, while harder materials might need adjustments to accommodate their resistance to machining forces.
Evaluating Product Applications
Tailoring Tolerance Levels to Suit Functional Requirements
The application of your product should guide tolerance specifications. Components destined for high-precision industries such as aerospace or medical devices often require extremely tight tolerances, while general consumer products might not.
Identifying Scenarios Where Tight Tolerances Are Essential
Tight tolerances are crucial when parts need to fit seamlessly into an assembly or when they play a critical role in the functionality of a system. Identifying these scenarios early in the design phase helps in setting the right tolerance levels from the outset.
Importance of Cutting Tool Quality
Investing in High-Performance Tools for Precision Machining
High-quality cutting tools are essential for achieving desired tolerances. Investing in high-performance tools not only enhances machining accuracy but also extends tool life, reducing long-term costs.
Minimizing Variations Through Proper Tool Maintenance
Regular maintenance of cutting tools is crucial in minimizing variations in tolerances. Ensuring tools are sharp, properly configured, and replaced when worn out helps maintain consistent machining quality.
Selecting Suitable CNC Machining Services
Partnering with Expertise to Ensure Tolerance Adherence
Choosing a CNC machining service with proven expertise in your industry ensures that your tolerance requirements are met. Look for services with a strong track record in delivering high-precision parts and the capability to handle the complexities of your project.
Communicating Tolerance Specifications Effectively
Effective communication of your tolerance specifications is key to a successful partnership with a machining service. Providing clear, detailed drawings and specifying which dimensions have tighter tolerances can help the service tailor their machining strategy to meet your needs.
Industries Requiring Precision CNC Tolerances
In the world of manufacturing, precision is not just a measure of quality but a fundamental requirement for functionality and safety. Certain industries demand exacting precision and CNC machining tolerances tighter than a gnat's eyelash. Let's delve into an overview of these sectors and explore examples where high tolerance levels are non-negotiable.
Overview of Industries with Stringent Tolerance Requirements
Highlighting Sectors Where Precision Machining Is Vital
1. Aerospace: Every component in an aircraft or spacecraft must adhere to the strictest tolerances to ensure safety, performance, and reliability. Even the slightest deviation can lead to catastrophic failures.
2. Medical Devices: Precision is paramount in the medical industry. Surgical instruments, implants, and diagnostic equipment require flawlessly machined parts to function correctly and safely within the human body.
3. Automotive: High-performance and safety-critical components such as engine parts and braking systems depend on precise tolerances to operate efficiently and reliably.
4. Electronics: In the ever-shrinking world of electronic devices, the need for precision machined components is crucial. Tight tolerances are essential for ensuring the functionality and integration of tiny parts in smartphones, computers, and other gadgets.
Examples of Applications Demanding High Tolerance Levels
● Jet Engine Components: The blades and other critical parts of a jet engine must be machined to tolerances measured in thousandths of an inch to ensure optimal airflow and engine performance.
● Orthopedic Implants: Devices such as hip and knee replacements must be manufactured to exacting tolerances to fit perfectly within the human body and to provide the durability and functionality required.
● Automotive Transmission Gears: Gears within an automobile's transmission system require high-precision machining to engage smoothly, transmit power efficiently, and ensure the vehicle's longevity.
● Semiconductor Manufacturing Equipment: The machines used to manufacture semiconductors operate with components that must be produced with microscopic tolerances to handle the precise manipulation of silicon wafers and chips.
Conclusion
So, let's wrap things up about CNC machining tolerances. They're super important in making sure everything in the machining process goes smoothly. These tolerances help make parts consistent and work like they should, saving time and money. But remember, picking the right materials, designing your parts well, and understanding the manufacturing steps are key to hitting those tolerance targets.
In short, machining tolerances are something you can't ignore, no matter the project. They're crucial for saving costs and improving the quality of what you make. If all this tolerance talk seems too complex, don't worry, You can concat TEAM MFG for help!
FAQs
Q: Why are tolerances important in CNC machining?
A: Tolerances ensure parts fit and function as intended. They maintain quality and prevent product failures. Precision is crucial for complex assemblies.
Q: What is the difference between standard and precision machining tolerances?
A: Standard tolerances are general, less strict guidelines. Precision tolerances are tighter, specified for critical applications. It affects manufacturing accuracy and cost.
Q: How do surface roughness and tolerances relate to each other?
A: Surface roughness affects part functionality and aesthetics. Tolerances dictate dimensional accuracy; both ensure part quality. They complement each other in specifications.
Q: How can I determine the appropriate tolerances for my CNC machined parts?
A: Consider function, assembly requirements, and material. Analyze the part's end use and critical features. Consult machining experts and standards.
Q: How do international standards like ISO 2768 contribute to tolerance management?
A: They provide a global framework for tolerance specifications. Enhance consistency and compatibility across industries. Help simplify design and manufacturing processes.
Q: Can tighter tolerances lead to higher machining costs?
A: Yes, tighter tolerances require more precise operations. Increases machining time and tool wear. Can necessitate advanced equipment, raising costs.


