Vacuum voids can ruin your plastic products. These hidden defects weaken the strength of molded parts, causing significant issues. But what exactly are vacuum voids, and why are they such a problem?
In this post, you'll learn about vacuum voids, their causes, and effective solutions to prevent them. Dive in to ensure high-quality, defect-free injection molded products.
What Exactly are Vacuum Voids in Injection Molding?
Vacuum voids, also known as air pockets, are empty spaces that form inside injection molded parts. They occur when the plastic material shrinks unevenly during cooling.
How Vacuum Voids Form
When molten plastic is injected into the mold, it begins to cool and solidify. The outer layers, which are in contact with the cooler mold surfaces, harden first. As the interior plastic cools more slowly, it tends to shrink and pull away from the hardened outer shell. If there isn't enough molten plastic to fill the void created by this shrinkage, a vacuum void forms.
Appearance of Voids
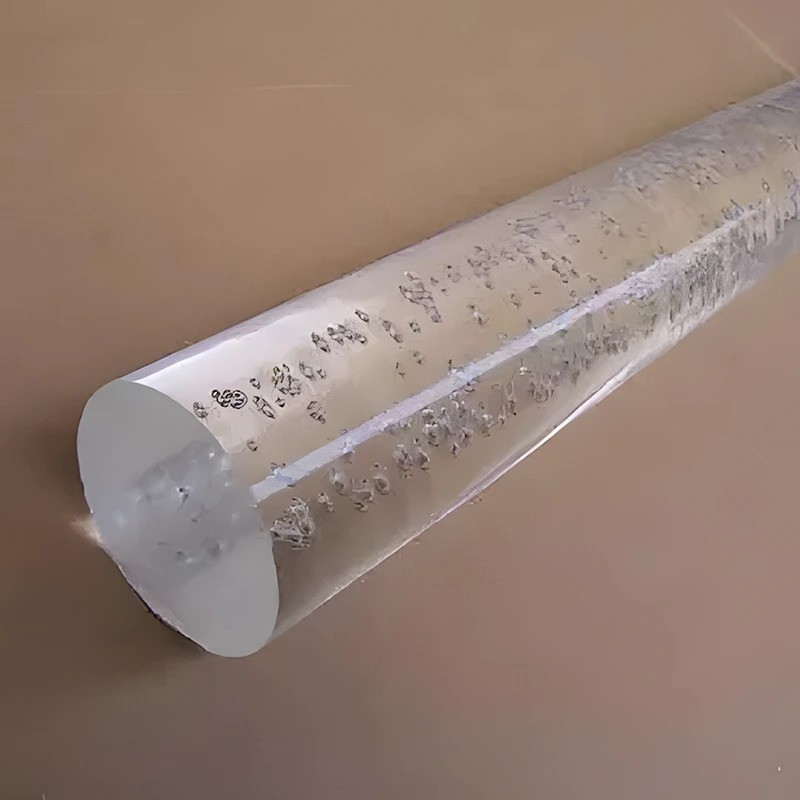
In transparent parts, voids are easily visible as air bubbles suspended within the plastic. However, in opaque or colored parts, they may be hidden inside the material. Detecting internal voids often requires sectioning the part or using non-destructive methods like CT scanning.
Common Void Locations
Voids tend to occur in areas with:
These geometries are prone to uneven cooling and shrinkage, which increases the likelihood of void formation.
Some typical void-prone features include:
| Feature |
Description |
| Bosses |
Thick, cylindrical projections |
| Ribs |
Thin, perpendicular reinforcements |
| Corners |
Intersections of walls at angles |
Why are Vacuum Voids a Problem?
Vacuum voids may seem like minor cosmetic blemishes, but they can seriously impact the performance and quality of injection molded parts. Let's explore why they're such a big deal.
Weakened Strength and Durability
Voids are essentially empty spaces within the part's structure. They reduce the effective cross-sectional area and create stress concentrations. This means the part is more likely to crack, break, or fail under load. Voids can dramatically compromise the strength and mechanical properties of the molded component.
Cosmetic Concerns
In transparent parts, voids are glaringly obvious. They appear as unsightly bubbles that detract from the part's appearance. For products where aesthetics are important, like lenses or display covers, voids are unacceptable. They diminish the perceived quality and value of the item.
Quality and Performance Issues
Even if voids don't cause immediate failures, they can still affect the part's functionality. For example:
In fluid handling components, voids can disrupt smooth flow
In electronic housings, voids can allow moisture ingress
In structural parts, voids can lead to premature fatigue
Eliminating voids is crucial to ensuring consistent, reliable part quality and performance. Manufacturers must prioritize void prevention to maintain customer satisfaction and avoid costly failures in the field.
Common Causes of Vacuum Voids in Injection Molding
Several factors can contribute to the formation of vacuum voids during injection molding. Here are some of the most common culprits:
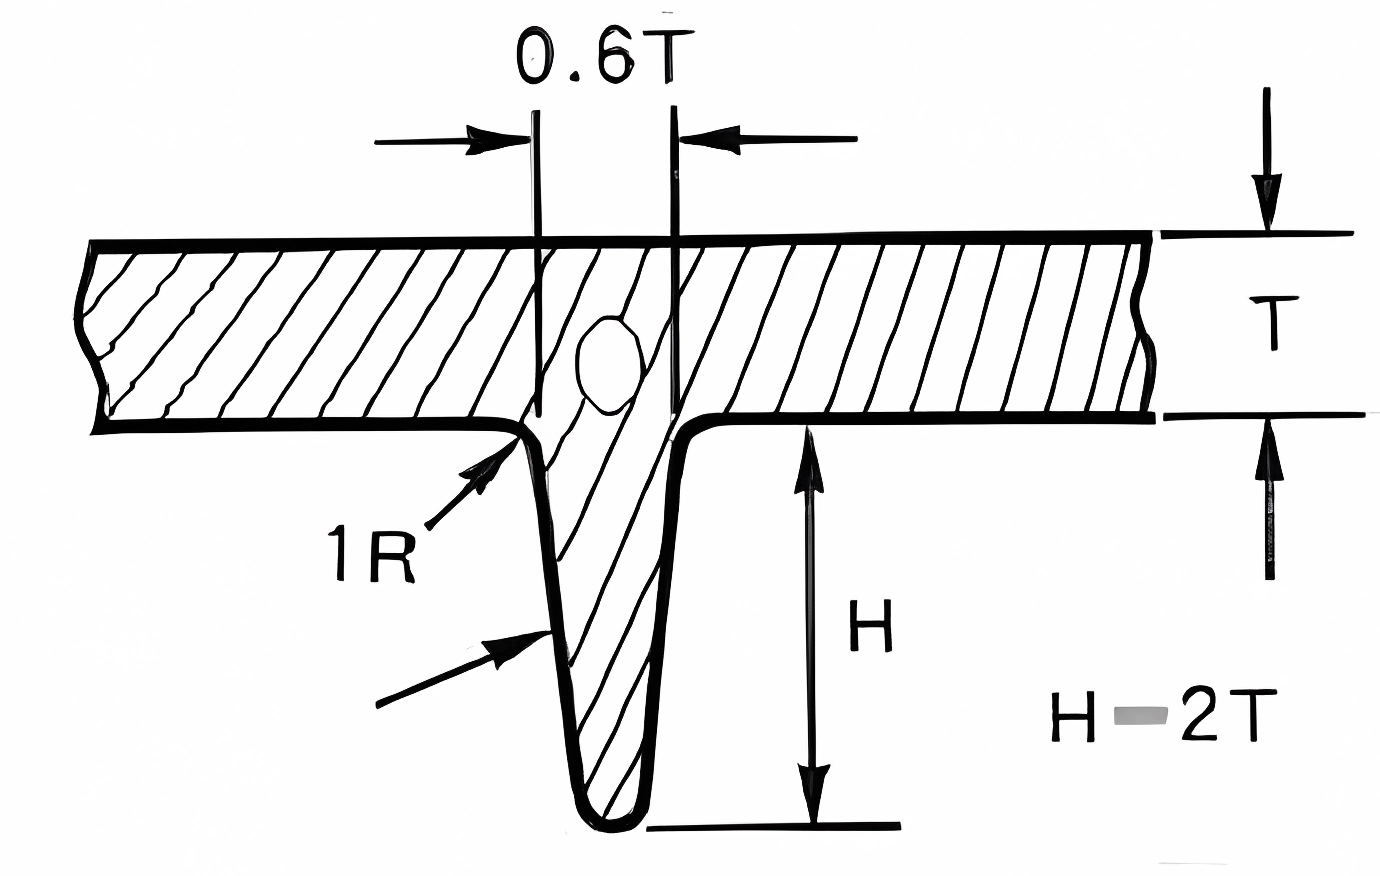
Thick Wall Sections
Parts with thick walls are prone to uneven cooling. The outer layers solidify first, while the interior remains molten. As the core material cools and shrinks, it can pull away from the outer "skin," creating voids.
Insufficient Packing
After the cavity is filled, additional material must be packed into the mold to compensate for shrinkage. If the packing pressure is too low or the packing time too short, there may not be enough plastic to fill the voids left by shrinking material.
Low Mold Temperature
A cold mold will cause the plastic to freeze off prematurely, before it can be fully packed out. This is especially problematic in thick sections or areas far from the gate.
Restricted Material Flow
Small gates or runners can limit the amount of plastic entering the cavity. They may freeze off too quickly, preventing adequate packing. Similarly, gates located far from thick sections may not allow enough flow to those void-prone areas.
Processing Parameters
Proper processing is crucial for avoiding voids. Key factors include:
Shot size: Ensure enough material is injected to fill and pack the cavity
Injection pressure: Maintain sufficient pressure to pack out the mold
Injection speed: Use a speed that balances fill time and packing effectiveness
Cooling time: Allow enough time for the material to solidify uniformly
Melt and mold temperatures also play a role. If they're too low, the material may not flow and pack properly.
Material Considerations
Certain material characteristics can exacerbate void formation:
Lack of reinforcing fibers: Fibers add strength and reduce shrinkage
Excessive moisture: Wet resin can outgas, causing bubbles and voids
How to Identify Vacuum Voids
Identifying vacuum voids is crucial for assessing part quality and troubleshooting injection molding issues. Here's how you can spot them:
Visual Inspection
In clear, transparent parts, voids are easy to see. They appear as bubbles or pockets within the material. A quick visual check can often reveal their presence.
Destructive Testing
For opaque parts, voids may be hiding beneath the surface. To find them, you'll need to cut the part open. Sectioning through thick areas or suspicious regions can expose internal voids.
Non-Destructive Testing
If you can't afford to destroy parts, non-destructive testing methods like CT scanning or X-ray imaging can help. They allow you to see inside the part without cutting it.
Common Void Locations
Pay extra attention to areas prone to voids, such as:
These geometries are more likely to experience shrinkage and void formation.
Void vs. Bubble Test
Sometimes, it's unclear if an imperfection is a void or a gas bubble. To tell the difference, try gently heating the area with a torch or heat gun. If it's a void, the surface will collapse inward as the air pocket expands. If it's a gas bubble, it will swell outward.
This simple test can quickly differentiate between the two types of defects.
Solutions to Eliminate Vacuum Voids
Now that we understand what causes vacuum voids, let's explore how to prevent them. There are three main approaches: optimizing part design, adjusting processing parameters, and selecting appropriate materials.
Part Design Optimization
Good part design is critical for avoiding voids. Keep these tips in mind:
Maintain uniform wall thickness throughout the part. Avoid abrupt changes in thickness.
Minimize overly thick areas. They're prone to uneven cooling and shrinkage.
Adjust gate size and location. Larger gates in thicker sections can improve packing.
Optimize runner size. Ensure runners are large enough to supply adequate material flow.
Processing Parameter Adjustments
Proper processing parameters can help minimize voids:
Increase shot size. Injecting more material helps compensate for shrinkage.
Boost injection pressure. Higher pressure improves packing and reduces voids.
Raise packing pressure and time. This ensures the mold is fully packed before cooling.
Lower melt temperature. Cooler material is less likely to outgas and form bubbles.
Increase mold temperature. Warmer molds promote more uniform cooling and less shrinkage.
Slow down injection speed. Slower filling allows more time for air to vent.
Shorten cooling time. Removing parts too quickly can cause uneven shrinkage and voids.
Fine-tuning these variables often requires a balanced approach. Make incremental adjustments and observe the results.
Material Selection
Choosing the right material can help combat voids:
Opt for higher viscosity polymers. They tend to pack better and shrink less.
Ensure materials are thoroughly dried. Moisture can lead to bubbles and voids.
Consider fiberfill ed materials. Fibers reduce shrinkage and improve strength.
Consult with your material supplier for recommendations on void-resistant grades.
| Approach |
Key Actions |
| Part Design |
- Uniform walls
- Minimize thick areas
- Optimize gates and runners |
| Processing Parameters |
- Increase shot size, pressure, packing
- Adjust temperatures and speeds |
| Material Selection |
- High viscosity polymers
- Dry materials
- Fiber reinforcements |
By combining these strategies, you can effectively minimize or eliminate vacuum voids in your injection molded parts.
Implementing Void Reduction Changes
With a solid understanding of void causes and solutions, it's time to put that knowledge into action. Implementing changes to eliminate voids requires a systematic, prioritized approach.
Design vs. Process: Where to Start?
In general, it's best to start with part design optimization. Why? Design changes are usually easier and less costly than process adjustments. They can also have a bigger impact on void prevention.
If design changes alone don't solve the problem, then move on to process tweaks. Adjusting parameters like pressure, temperature, and speed can further reduce voids.
Making Incremental Changes
When implementing void reduction changes, avoid the temptation to change everything at once. Instead, take a systematic, incremental approach:
Identify a single variable to adjust (e.g., wall thickness, gate size, injection pressure)
Make a small change to that variable
Mold some test parts and evaluate the results
If voids persist, make another incremental change
Repeat until voids are eliminated or minimized
This methodical approach helps isolate the impact of each change. It prevents confusion and allows you to identify the most effective adjustments.
Verifying Void Elimination
After making changes, it's crucial to verify that voids have been successfully eliminated. Conduct thorough testing on the modified parts:
Visual inspection for transparent parts
Sectioning or CT scanning for opaque parts
Destructive testing under load
Dimensional analysis to confirm shrinkage reduction
Document the results of each test. Compare void frequency and size to the original parts. If voids are still present, additional changes may be needed.
Conclusion: Banishing Vacuum Voids for Good
In this article, we've explored the causes and solutions for vacuum voids in injection molding. From thick walls and insufficient packing to low temperatures and material issues, a variety of factors can contribute to void formation.
Preventing voids requires a multi-pronged approach, including:
Optimizing part design for uniform thickness and proper gating
Adjusting processing parameters like pressure, temperature, and speed
Selecting materials with higher viscosity and lower shrinkage
Proactively addressing voids is crucial for ensuring the quality, strength, and performance of injection molded parts. Unchecked voids can lead to cosmetic defects, structural failures, and costly rework.
Partnering with experienced injection molding experts can be invaluable in the fight against voids. They can provide guidance on part design, process optimization, and material selection to help you achieve void-free parts consistently.
Don't let vacuum voids compromise your injection molded parts. Partner with the experts at Team Mfg for tailored solutions to prevent voids and ensure high-quality results. Contact us today to discuss your project and get started on the path to void-free success.


