Ever wondered how plastic parts stay securely fastened without screws or glue? Riveting offers a reliable solution. In this guide, we'll explore the essentials of plastic riveting, its significance in different industries, and how to choose the right method. You'll learn the ins and outs of riveting plastic parts for strong, durable connections.
What is Plastic Riveting?
Plastic riveting is a mechanical fastening method. It involves using axial force to deform the shank of a rivet inside a hole. This forms a head, connecting multiple parts.
Compared to metal riveting, plastic riveting has some key differences. It doesn't require additional rivets or posts. Instead, it uses plastic structures like columns or ribs. They're part of the plastic body.
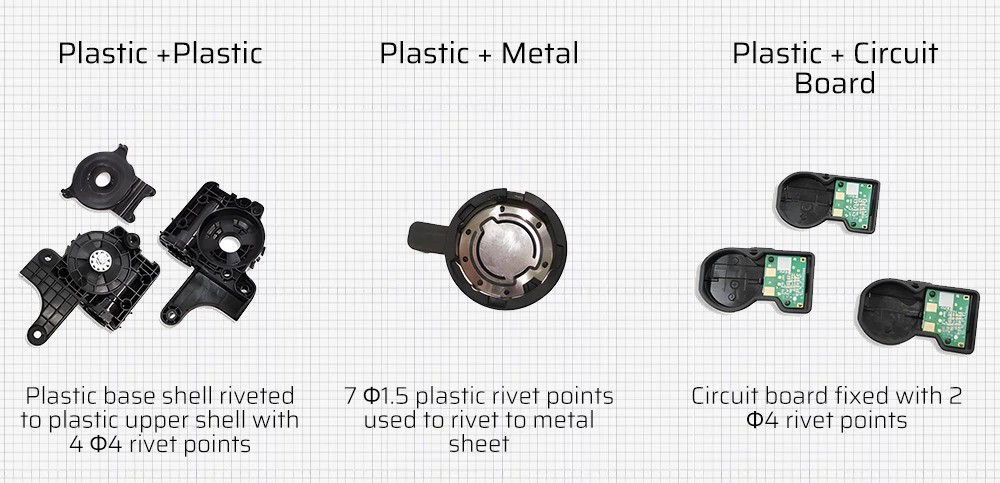
Advantages and Disadvantages of Plastic Riveting
Plastic riveting has several advantages and disadvantages. Let's take a closer look.
Common Advantages:
Simple part structure, reducing mold costs
Easy assembly, no extra materials or fasteners needed
High reliability
Can rivet multiple points simultaneously, improving efficiency
Joins plastic, metal, and non-metal parts, even in tight spaces
Withstands long-term vibration and extreme conditions
Simple, energy-saving, fast process
Easy visual quality inspection
Common Disadvantages:
Requires additional riveting equipment and tooling
Not suitable for high-strength or long-term loads
Permanent connection, not detachable or repairable
Difficult to repair if it fails
May need redundancy in design phase
| Advantage | Disadvantage |
| Simple structure, low mold costs | Needs extra equipment and tooling |
| Easy assembly, high reliability | Not for high-strength or long-term loads |
| Joins various materials efficiently | Permanent, not detachable or repairable |
| Withstands vibration and extreme conditions | Hard to repair, may need redundancy |
| Simple, fast, energy-saving process | - |
| Easy visual quality checks | - |
Types of Plastic Riveting Processes
There are three main types of plastic riveting processes. They are hot melt riveting, hot air riveting, and ultrasonic riveting.
Hot Melt Riveting
Hot melt riveting is a contact-type process. It involves a heating tube inside the riveting head. This heats the metal riveting head, which then melts and shapes the plastic rivet.
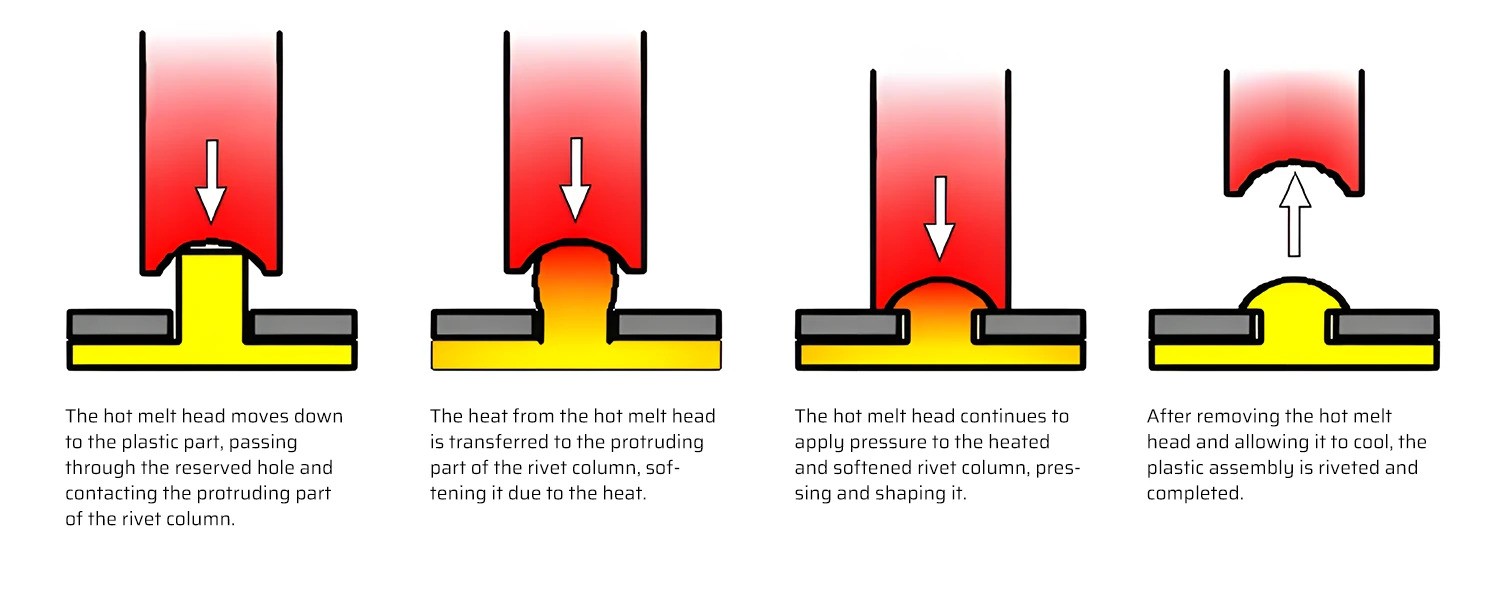
Advantages:
Disadvantages:
Insufficient cooling can cause plastic to stick to head
Not suitable for larger rivet columns
High residual stress and lower pull-out strength
Not recommended for products with high positioning/fixation requirements
Hot melt riveting is commonly used for PCB boards and plastic decorative parts.
Hot Air Riveting (Hot Air Cold Riveting)
Hot air riveting is a non-contact process. It uses hot air to heat and soften the plastic rivet column. Then, a cold riveting head presses and shapes it.
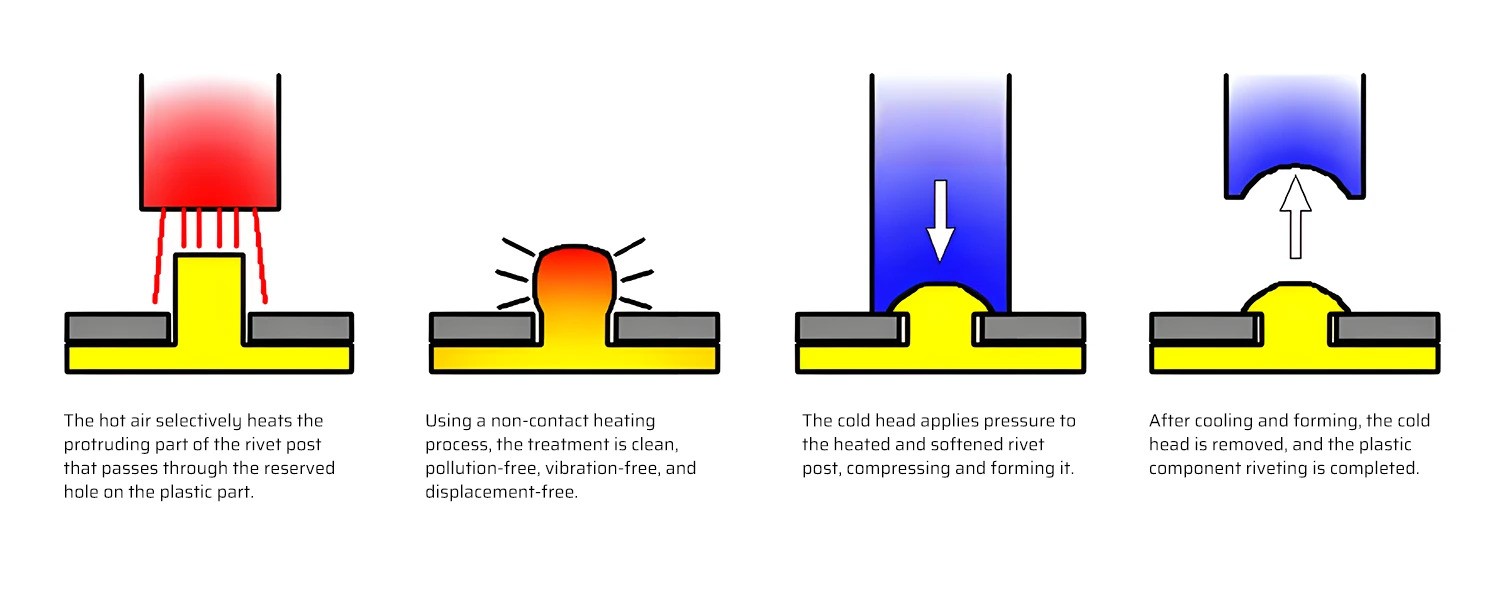
The process has two stages:
Heating: Hot air uniformly heats the rivet column until it's malleable.
Cooling: The cold riveting head presses the softened column, forming a firm head.
Advantages:
Uniform heating reduces internal stress
Cold riveting head quickly fills gaps, achieving a good fixing effect
Disadvantages:
Hot air riveting is suitable for most thermoplastic materials and glass fiber reinforced plastics.
Ultrasonic Riveting
Ultrasonic riveting is another contact-type process. It uses high-frequency vibrations to generate heat and melt the plastic rivet column.
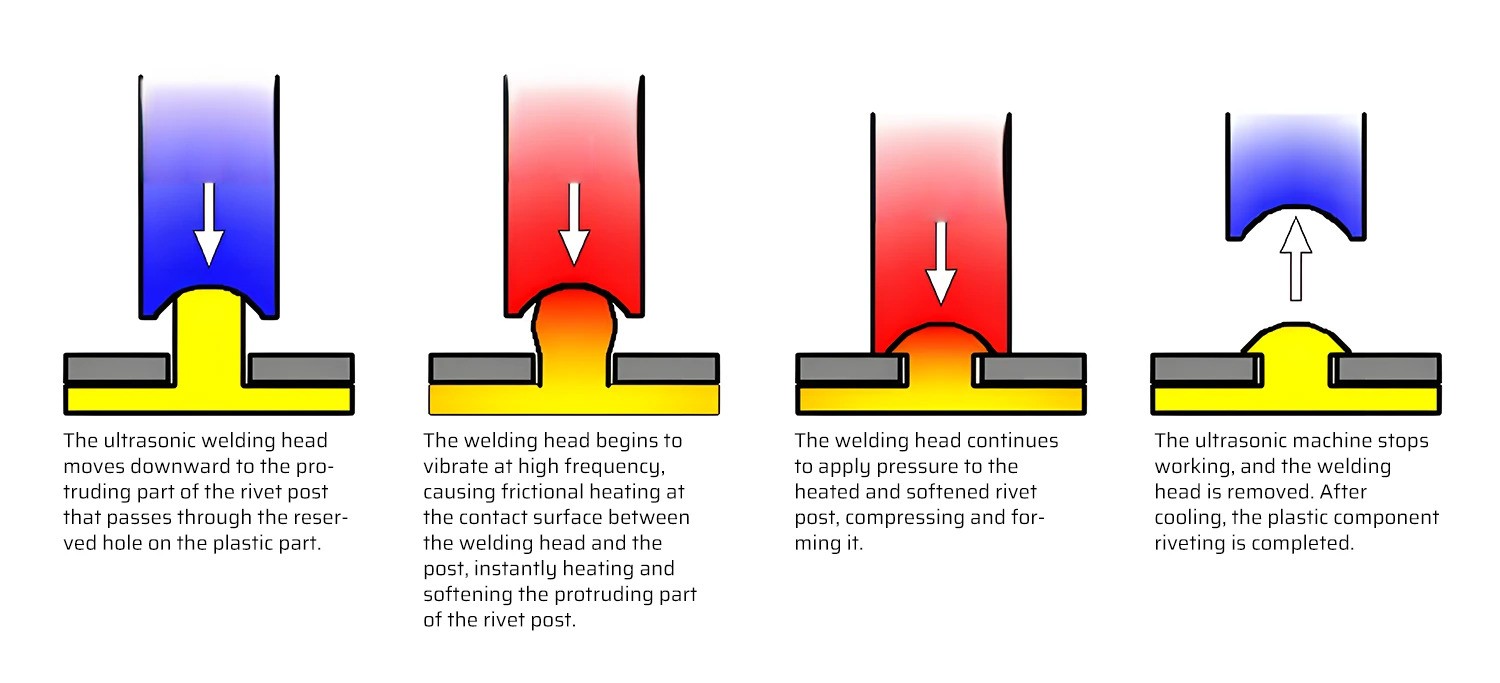
Advantages:
Disadvantages:
Uneven heating can cause loose or degraded columns
Limited distribution distance if using a single welding head
Vibrations can damage components to a certain extent
Ultrasonic riveting is not suitable for glass fiber materials or those with high melting points.
Here's a comparison table of the three processes:
| Process | Heating Method | Riveting Strength | Fixing Effect | Speed | Equipment Flexibility |
| Hot Melt | Contact (metal head) | Unreliable, sensitive to vibration | Defective due to incomplete softening | 6-60s | Integrated, complex changeover |
| Hot Air | Non-contact (hot air) | High, not sensitive to vibration | Excellent, completely fills gaps | 8-12s | Adjustable heating and riveting |
| Ultrasonic | Contact (vibration) | Unreliable | Defective due to incomplete softening | <5s | Limited control with integrated head |
Common Rivet Head Types for Plastic Parts
When it comes to plastic riveting, the geometry and dimensions of rivet heads are crucial. Let's take a look at some common types.
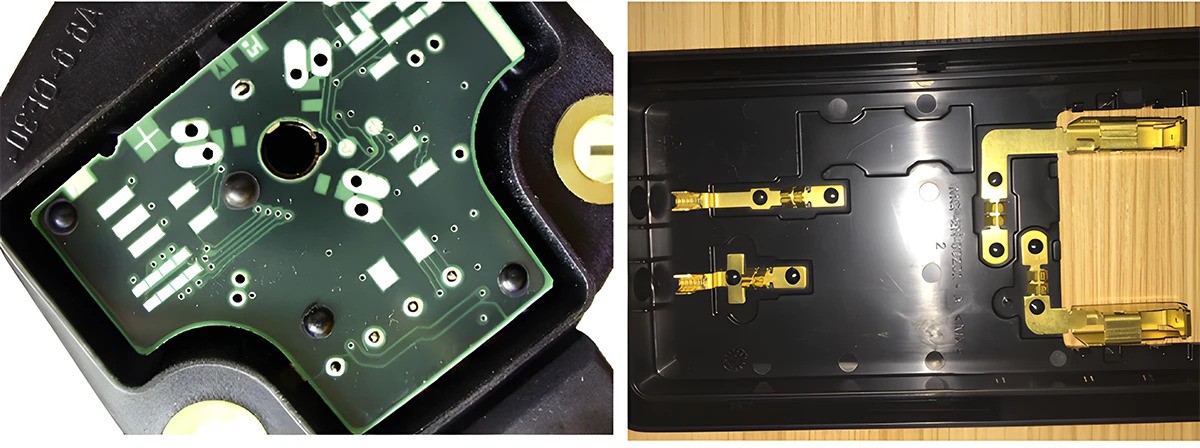
1. Semi-Circular Rivet Head (Large Profile)
This is the most common type. It's used when high strength isn't needed, like in PCBs or decorative parts.

Key points:
Suitable for rivet columns with D1 < 3mm (ideally > 1mm to prevent breakage)
H1 is generally (1.5-1.75) * D1
D2 is around 2 D1, H2 is about 0.75 D1
Specific numbers based on volume conversion: S_head = (85%-95%) * S_column
2. Semi-Circular Rivet Head (Small Profile)
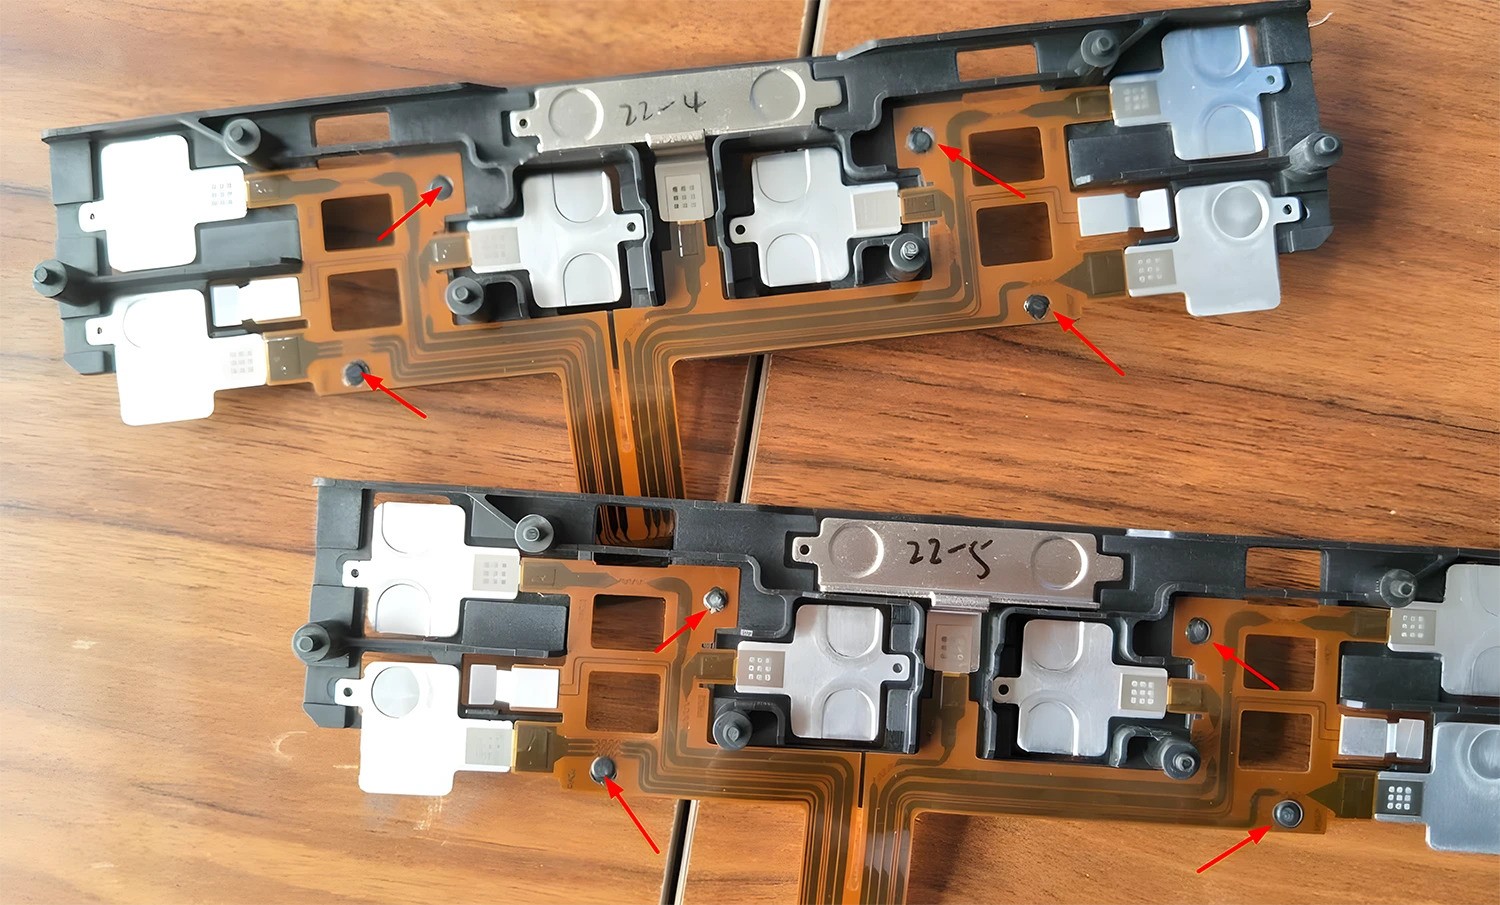
This type has a shorter riveting time than the large profile. It's also for low-strength applications, such as FPC cables or metal springs.

Design considerations:
D1 < 3mm, preferably > 1mm
H1 is normally 1.0 * D1
D2 is about 1.5 D1, H2 is around 0.5 D1
Volume conversion: S_head = (85%-95%) * S_column
3. Double Semi-Circular Rivet Head
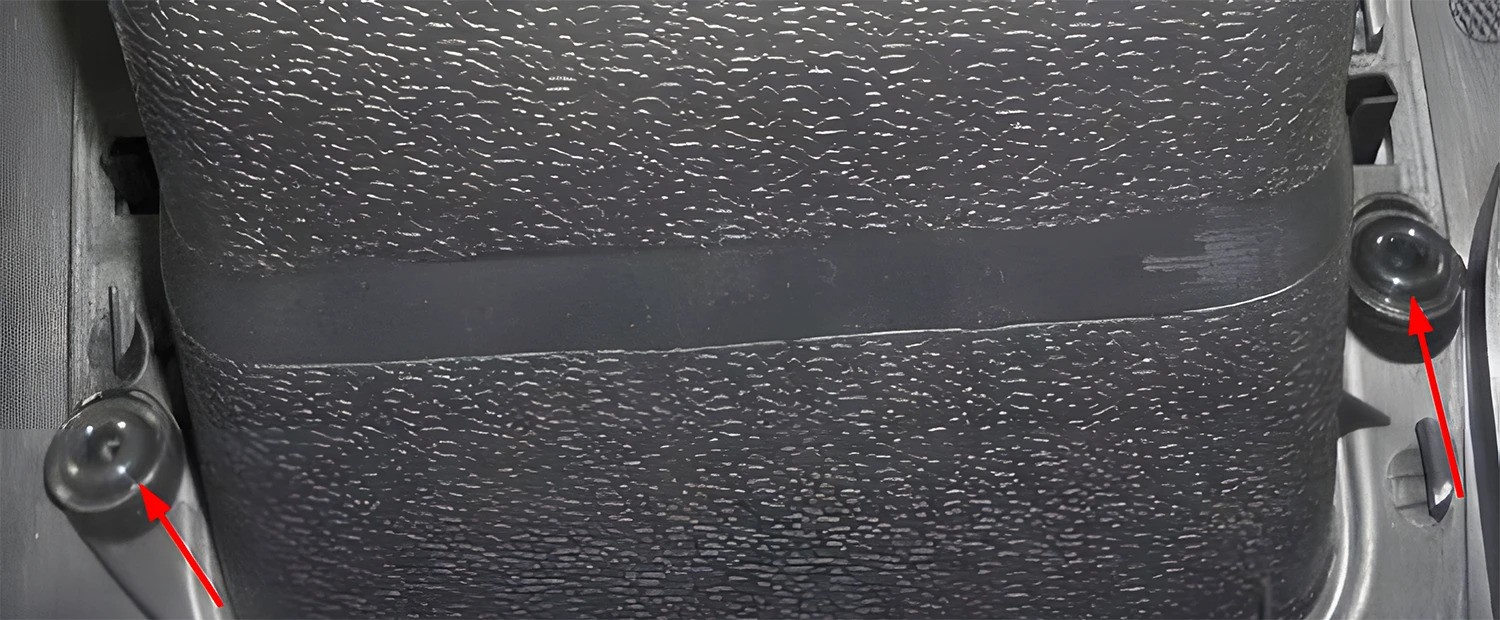
The rivet columns here are slightly larger than the semi-circular types. This design shortens riveting time and improves results. It's used when higher fixing strength is needed.

Key points:
Suitable for rivet columns with D1 between 2-5mm
H1 is typically 1.5 * D1
D2 is about 2 D1, H2 is around 0.5 D1
Volume conversion applies
Rivet column and mold hot riveting head centers must align for neat forming
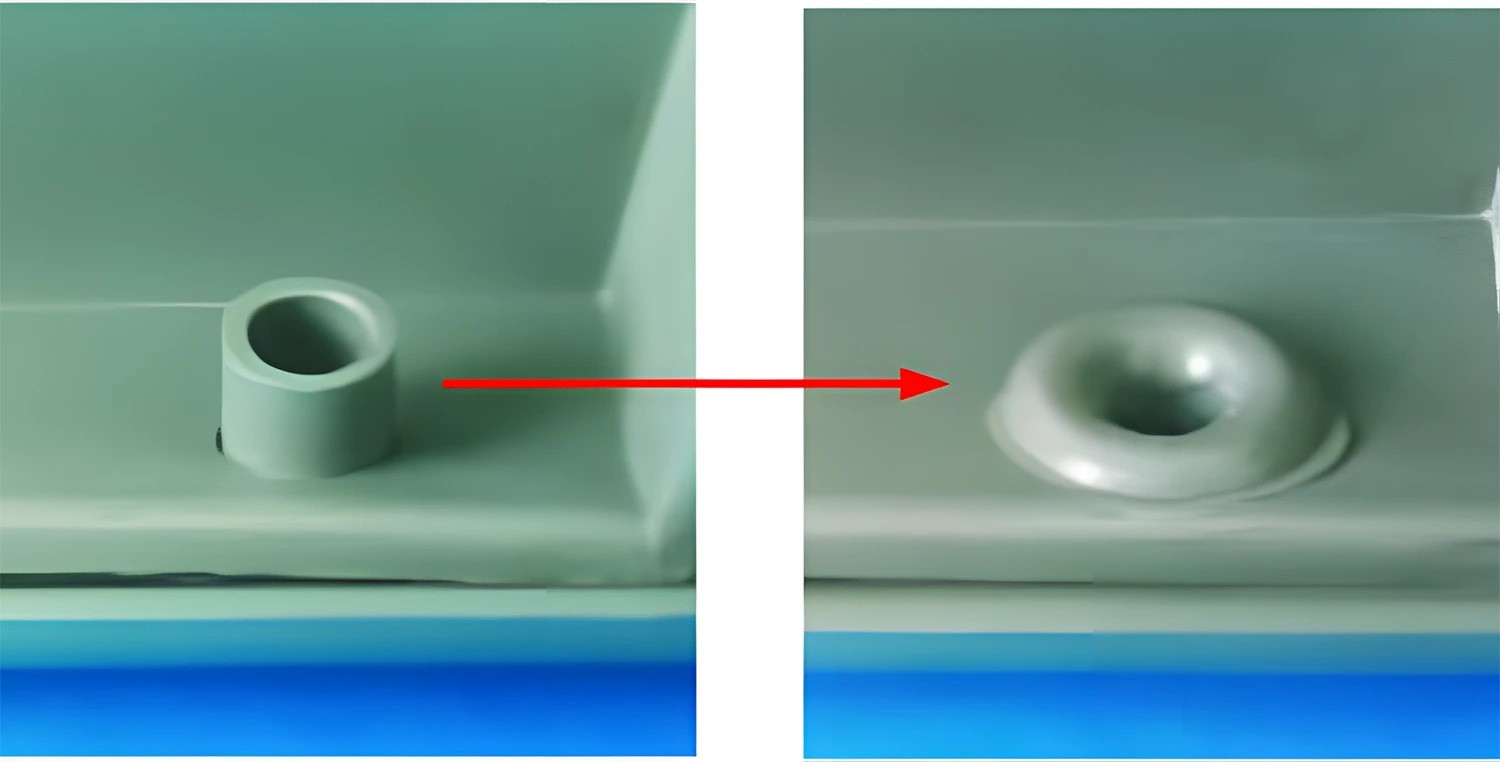
4. Annular Rivet Head
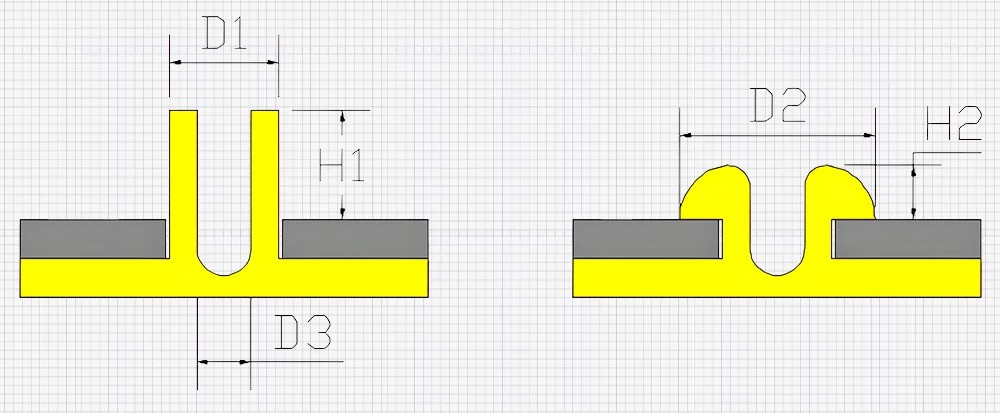
As the rivet column diameter increases, hollow columns are used. They shorten riveting time, improve results, and prevent shrinkage defects. This type is for applications needing higher fixing strength.
Characteristics:
D1 > 5mm
H1 is (0.5-1.5) * D1, smaller value for larger diameters
Inner D is 0.5 * D1 to avoid back shrinkage
D2 is around 1.5 D1, H2 is about 0.5 D1
Volume conversion applies
Even heating of hollow columns helps form qualified heads
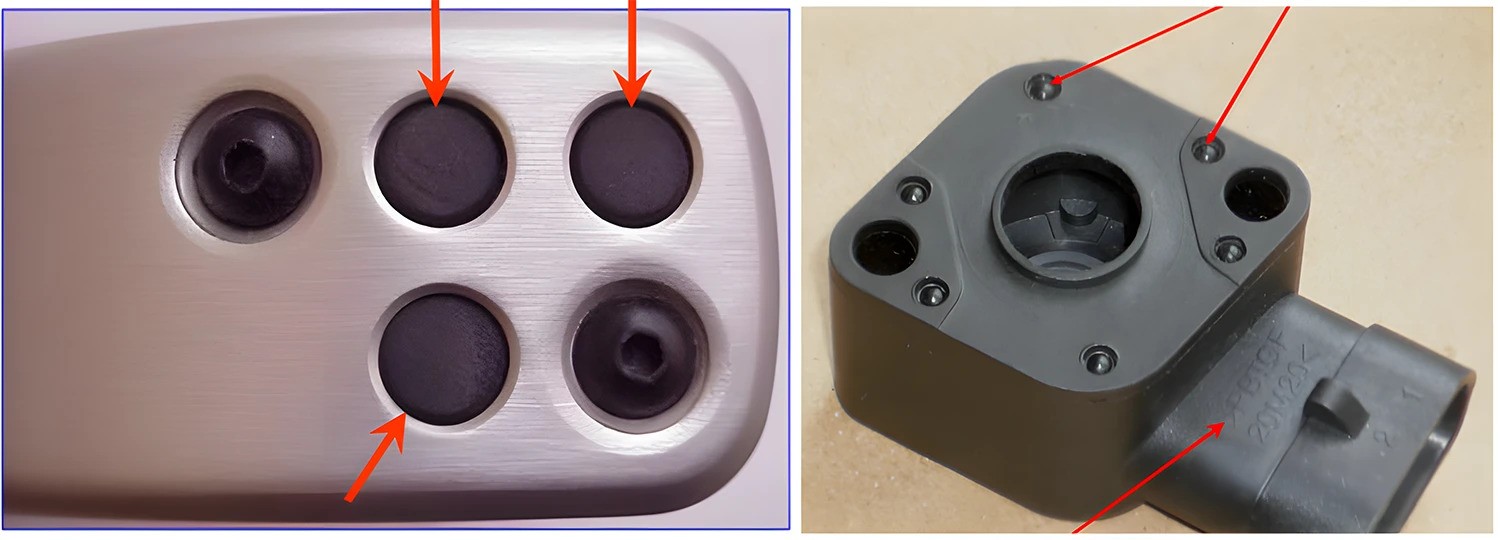
5. Flat Rivet Head
Flat heads are suitable when the formed head shouldn't protrude from the surface.

Design notes:
D1 < 3mm
H1 is typically 0.5 * D1
D2 and H2 based on volume conversion
Connected part needs sufficient thickness for countersinking
Insufficient thickness leads to unreliable connection and inadequate strength
6. Ribbed Rivet Head
Use ribbed heads when you need a larger contact area but don't have space for hollow columns.
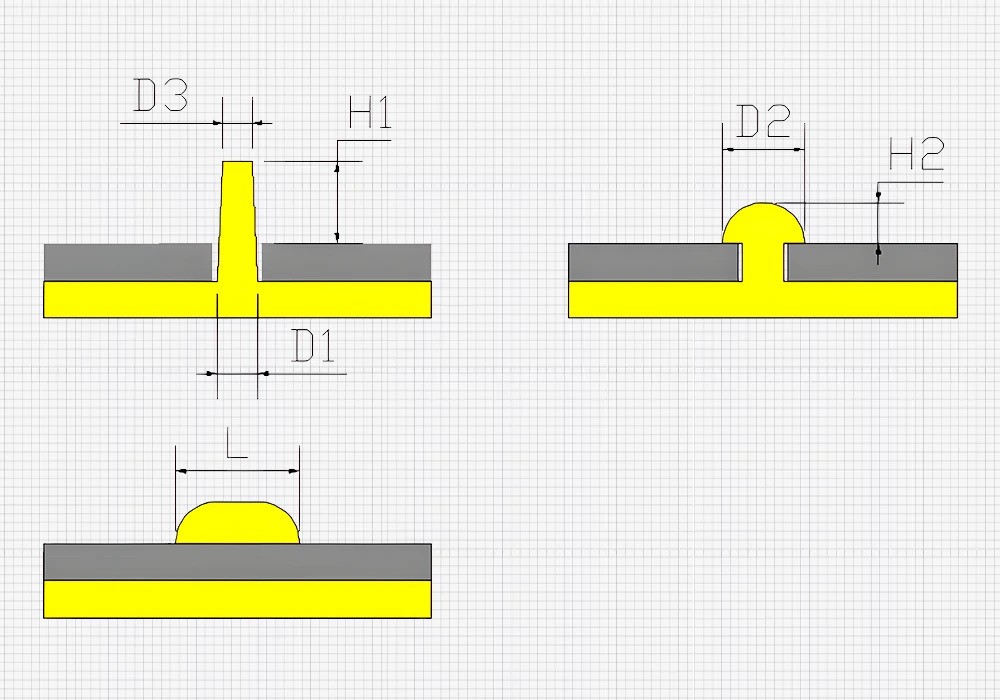
Key points:
Base diameter D1 < 3mm, top diameter D3 = (0.4-0.7) * D1
H1 is (1.5-2) * D1, less than column height L
D2 is about 2 D1, H2 is around 1.0 D1
Volume conversion applies
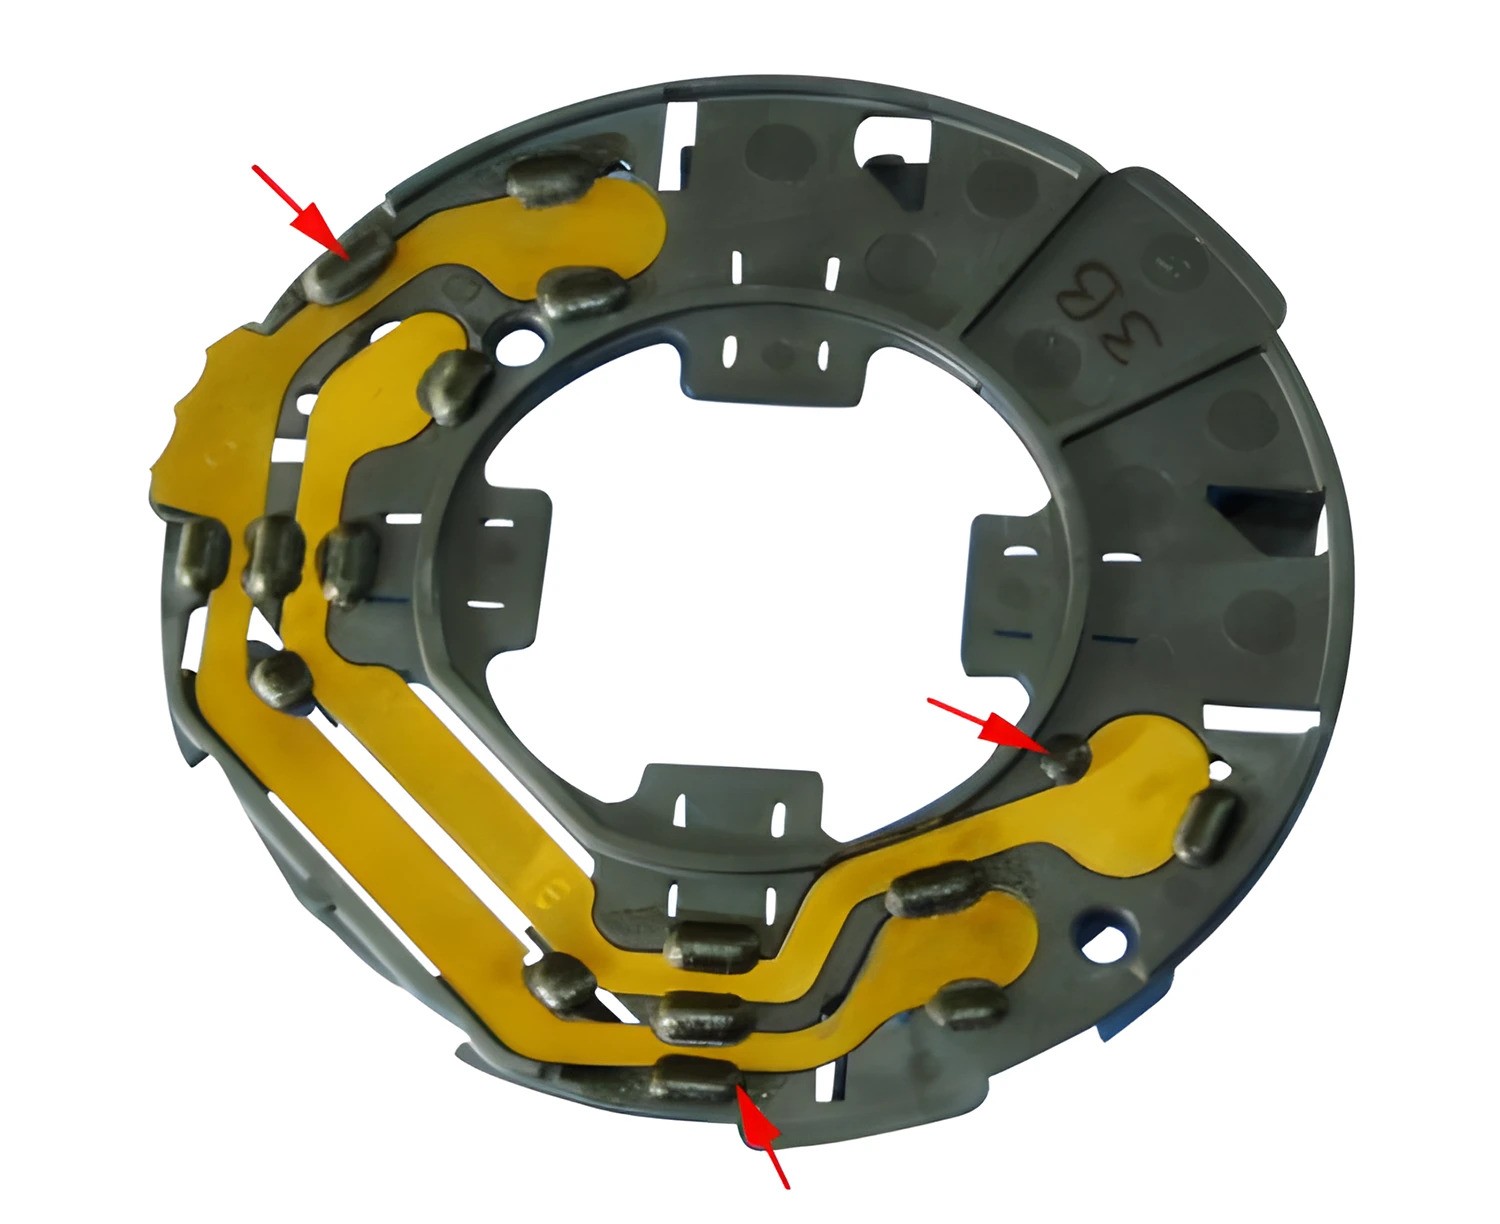
7. Flanged Rivet Head
Flanged heads are ideal for connectors requiring crimping or wrapping.
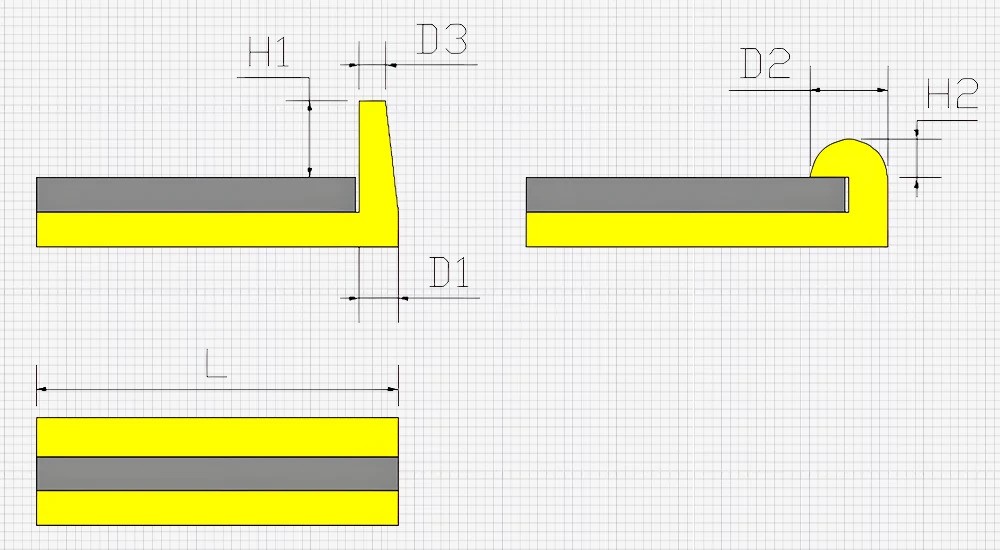
Design considerations:
Base diameter D1 < 3mm, top diameter D3 = (0.3-0.5) * D1
H1 is (1.5-2) * D1, less than column length L
D2 is normally 2 D1, H2 is about 1.0 D1
Volume conversion applies
Design Considerations for Rivet Columns and Rivet Heads
When designing rivet columns and heads, there are several key factors to keep in mind. Let's explore them in detail.
Designing Rivet Columns on Inclined Surfaces or Far from Base
If the rivet column is on an inclined plane or far from the base surface, special design is needed. Here are two methods:

Design Method for Rivet Columns on Inclined Surfaces
For inclined surfaces, the rivet column should be perpendicular to the surface. This ensures proper alignment and secure fastening.
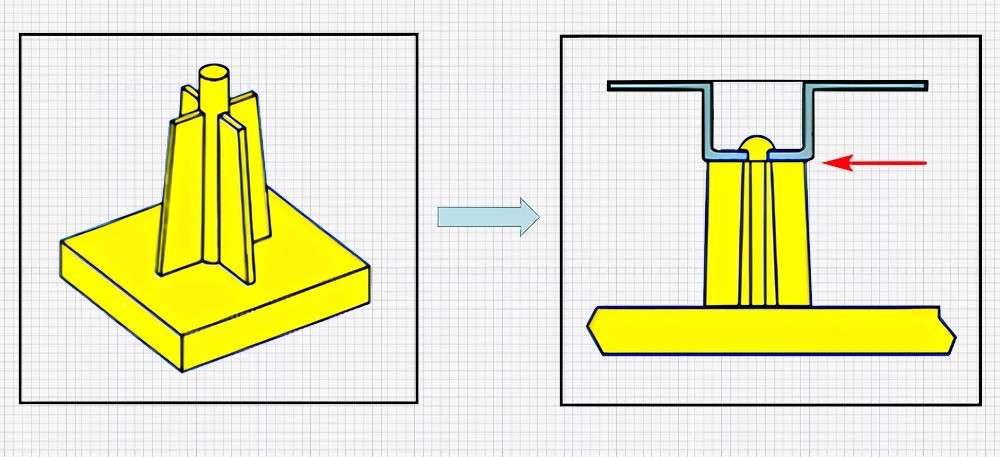
Design Method for Rivet Column Positioned High Above the Base Surface
When the column is high above the base, adding support structures is crucial. They prevent bending or breaking during riveting.
The Importance of Redundancy Design
Plastic riveting creates permanent connections that are difficult to repair if they fail. Incorporating redundancy in the design is essential.
One approach is doubling the number of rivet columns and holes. Initially, only the primary set (e.g., yellow) is used. If repair is needed, the secondary set (e.g., white) provides a backup.
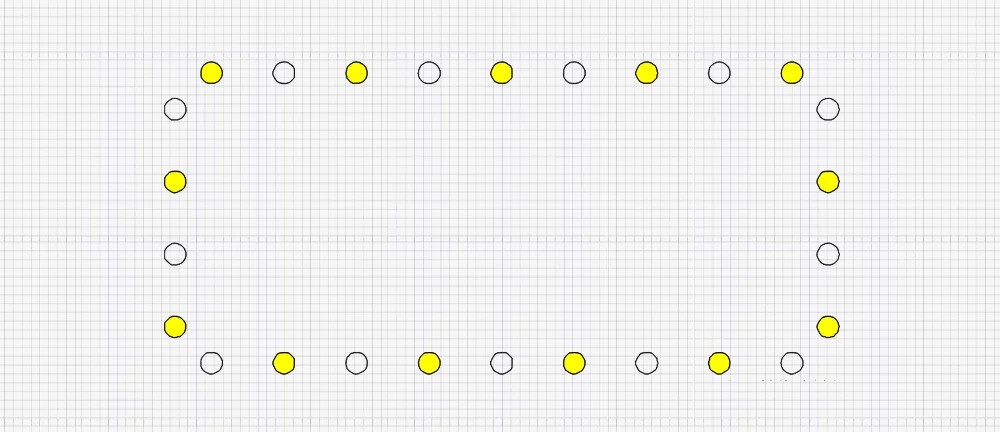
This redundancy gives you a second chance at repair, increasing the overall reliability of the riveted assembly.
Relationship Between Rivet Head and Column Dimensions
The dimensions of the rivet head and column are closely related. Here are some key relationships to consider:
Rivet head diameter (D2) is generally around 2 times the column diameter (D1)
Rivet head height (H2) is typically about 0.75 times D1 for large semi-circular heads, and 0.5 times D1 for small semi-circular heads
The specific dimensions should be based on volume conversion: S_head = (85%-95%) * S_column
This volume conversion ensures that the rivet head has sufficient material to form a strong, secure connection without excessive waste.
Material Adaptability for Plastic Riveting
Not all plastics are suitable for riveting. Let's explore the key factors that determine a material's adaptability.
Thermoplastics vs. Thermosets
Thermoplastics can melt and be reshaped within a specific temperature range. They're ideal for riveting.
In contrast, thermosets harden permanently when heated. They're difficult to rivet using standard methods.
Therefore, product structures often involve thermoplastics when riveting is required.
Amorphous vs. Semi-Crystalline Plastics
Thermoplastics are further divided into amorphous and semi-crystalline types. Each has unique characteristics that affect riveting.
Amorphous (Non-Crystalline) Plastics
Disordered molecular arrangement
Gradual softening and melting at glass transition temperature (Tg)
Suitable for all three riveting processes (hot melt, hot air, ultrasonic)
Semi-Crystalline Plastics
Ordered molecular arrangement
Distinct melting point (Tm) and recrystallization point
Remain solid until reaching melting point, then quickly solidify when cooled
More suitable for hot melt riveting due to combined heating and forming
Regular spring-like structure absorbs ultrasonic energy, making ultrasonic riveting challenging
Higher melting points require more ultrasonic energy to melt
Careful design considerations needed for ultrasonic riveting (higher amplitude, joint design, welding head contact, distance, fixtures)
Minimize initial contact between rivet column top and welding head to concentrate energy
Impact of Fillers (e.g., Glass Fibers)
Fillers can significantly affect a plastic's riveting performance. Let's look at glass fibers as an example.
Key points:
Large difference in melting points between plastic and glass fibers
Hot melt riveting: Precise temperature control (±10°) crucial
High temperatures cause glass fiber precipitation, adhesion, and rough surfaces
Low temperatures lead to cracks and cold forming
Ultrasonic riveting: More vibration energy needed to melt plastic
Filler content guidelines:
<10%: Minimal effect on material properties, beneficial for soft materials (PP, PE, PPS)
10-30%: Reduces riveting strength
-
30%: Significantly impacts riveting performance
Other material properties affecting ultrasonic riveting:
Hardness: Higher hardness generally improves riveting
Melting point: Higher melting points require more ultrasonic energy
Purity: Higher purity enhances riveting, while impurities in recycled materials reduce performance
Plastic Materials Used in Riveting
Selecting the right plastic material is crucial for successful riveting. Let's take a closer look at some common options.
Low Density Polyethylene (LDPE)
LDPE has a low density due to its loosely packed molecular structure. It's flexible yet tough.
Key properties:
Polypropylene (PP)
PP is widely used across industries, from automotive to packaging. It offers good chemical resistance and electrical insulation.
Applications:
Nylon
Nylon, particularly Nylon 6/6, is popular in manufacturing. Its low friction makes it ideal for gears and bearings.
Characteristics:
Resists most chemicals, but can be attacked by strong acids, alcohols, and alkalis
Poor resistance to dilute acids, excellent resistance to oils and greases
Used for snap rivets, unscrewing rivets, and push-in knob head rivets
Acetal (Polyoxymethylene, POM)
Acetal, or POM, is strong, rigid, and resistant to moisture, heat, chemicals, and solvents. It has good electrical insulation properties.
Uses:
Gears, bushings, automotive door handles
Quarter turn panel fasteners
Panel strikers
Snap-in flush top rivets
Polysulfone (PSU)
PSU is used in specialty applications due to its high thermal and mechanical capacity.
Key features:
Comparison of Material Properties
Here's a table comparing the properties of these materials:
| Properties | LDPE | PP | Nylon 6/6 | Acetal | PSU |
| Tensile Strength (psi) | 1,400 | 3,800-5,400 | 12,400 | 9,800-10,000 | 10,200 |
| Impact Toughness (J/m²) | No break | 12.5-1.2 | 1.2 | 1.0-1.5 | 1.3 |
| Dielectric Strength (kV/mm) | 16-28 | 20-28 | 20-30 | 13.8-20 | 15-10 |
| Density (g/cm³) | 0.917-0.940 | 0.900-0.910 | 1.130-1.150 | 1.410-1.420 | 1.240-1.250 |
| Max. Continuous Service Temp. | 212°F (100°C) | 266°F (130°C) | 284°F (140°C) | 221°F (105°C) | 356°F (180°C) |
| Thermal Insulation (W/m·K) | 0.320-0.350 | 0.150-0.210 | 0.250-0.250 | 0.310-0.370 | 0.120-0.260 |
Keep in mind that additives and stabilizers can enhance certain properties. For example, UV stabilizers can improve nylon's outdoor performance.
How to Choose the Right Size Rivet
General Rule of Thumb
A simple approach is to base the rivet diameter on the thickness of the plates being joined. Here's the rule of thumb:
Rivet Diameter = 1/4 × Plate Thickness
This ratio ensures that the rivet is proportional to the material it's holding together. It's also known as the grip range.
Factors to Consider
While the general rule is a good starting point, there are other factors to keep in mind:
Material properties
Joint design
Type of joint (lap, butt, etc.)
Loading conditions (shear, tension, etc.)
Aesthetics
Visible or hidden joint
Flush or protruding head
Assembly process
These factors can influence the optimal rivet size. In some cases, you may need to deviate from the general rule to achieve the best results.
Examples and Calculations
Let's look at a few examples to illustrate the sizing process.
Example 1:
Example 2:
Plate thickness: 10 mm
Rivet diameter = 1/4 × 10 mm = 2.5 mm
Round up to the nearest standard size, e.g., 3 mm
Example 3:
Plate thickness: 2 mm (thin plates)
Rivet diameter = 1/4 × 2 mm = 0.5 mm
Increase to a minimum practical size, e.g., 1 mm, for ease of installation and strength
Remember, these calculations provide a starting point. Always consider the specific requirements of your application and make adjustments as needed.
| Plate Thickness (mm) | Rivet Diameter (mm) |
| 1-2 | 1 |
| 3-4 | 1-2 |
| 5-8 | 2-3 |
| 9-12 | 3-4 |
| 13-16 | 4-5 |
Conclusion
In this guide, we explored the various riveting processes for plastic parts, including hot melt, hot air, and ultrasonic methods. We also discussed different rivet head types and their specific applications.
Choosing the right riveting process and materials is crucial for ensuring strong and durable connections in plastic assemblies. The correct selection can significantly impact the longevity and performance of your products.
Now that you have this knowledge, we encourage you to apply these insights to your projects. By doing so, you’ll ensure better outcomes and more reliable assemblies in your manufacturing endeavors. Contact us today!


