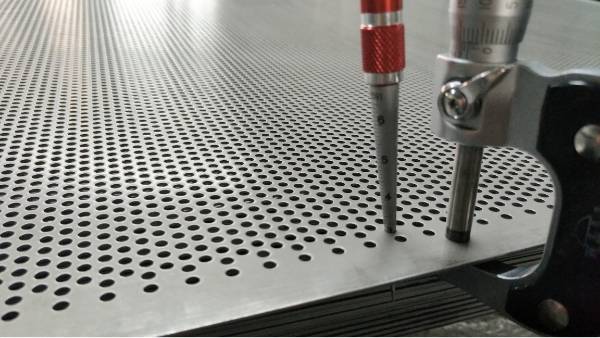
Holes play a crucial role in engineering and CNC machining, but understanding the various types, symbols, and applications can be challenging. Have you ever wondered what a counterbore hole is or how to identify different hole callouts in engineering drawings?
This article will dive deep into the most common types of holes used in engineering, including blind holes, through holes, counterbore holes, spot face holes, and more. We'll explore their unique characteristics, applications, and how to identify them in engineering drawings using standardized symbols and callouts.
The Significance of Holes in Engineering
Holes play a crucial role in various engineering fields. They serve multiple purposes, from allowing the passage of wires and fluids to accommodating fasteners. Holes are essential for the assembly and functionality of countless engineered components and systems.
In mechanical engineering, holes are used for fastening parts together. Threaded holes, which feature internal threads created through tapping or thread milling, allow bolts and screws to securely hold components in place. Clearance holes, on the other hand, provide space for fasteners to pass through without engaging the threads.
Holes are also vital in electrical and electronic engineering. PCBs (printed circuit boards) rely on holes to mount and connect electronic components. Through holes (Ø THRU) enable the passage of wires and leads, while blind holes, marked with the ⌴ symbol, provide a specific depth for component placement.
Understanding Hole Features
General Definition and Characteristics

Shape, Size, and Depth
Holes are essential elements in engineering design. They come in various shapes, sizes, and depths. The most basic hole type is a straightforward opening with a circular cross-section, denoted by the Ø symbol.
Hole diameter is a crucial aspect of hole design. It determines the size of fasteners or components that can pass through or fit into the hole. Depth is another important characteristic, specifying how far the hole extends into the material.
Hole Location and Tolerances
Hole location is critical in engineering applications. It ensures proper alignment and functionality of components. Tolerances specify the acceptable variation in hole dimensions and position.
Precise hole location is essential for assembly processes. Misaligned holes can lead to fitment issues and compromised performance. Tolerances help maintain consistency and interchangeability of parts.
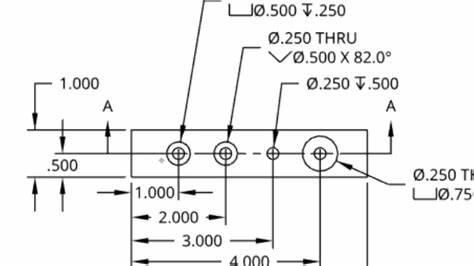
Callout symbols on engineering drawings indicate hole specifications. These include diameter, depth, and location dimensions. Proper interpretation of these symbols is crucial for accurate machining and hole creation.
Machining Techniques for Hole Creation
Drilling, Boring, Reaming, and More
Various machining techniques are employed to create holes in engineering components. The choice of method depends on factors such as hole size, depth, precision requirements, and material properties. Some common hole-making processes include:

1.Drilling: This is the most common method for creating cylindrical holes. It involves using a rotating drill bit to remove material and create a hole of the desired diameter and depth.
2.Boring: Boring is used to enlarge or improve the accuracy of pre-existing holes. It involves using a single-point cutting tool to remove material from the hole's surface, achieving precise dimensions and smooth finishes.
3.Reaming: Reaming is a finishing operation that improves the surface finish and dimensional accuracy of drilled or bored holes. It involves using a multi-edged cutting tool called a reamer to remove small amounts of material and achieve a seamless finish.
4.Thread Milling: Thread milling is a process used to create internal threads in holes. It involves using a thread milling tool to cut threads into the hole's surface, allowing threaded fasteners to be used for assembly.
Other specialized hole-making techniques include:
● Tapping: Creating internal threads using a tapping tool
● Counterboring: Creating a larger diameter recess at the top of a drilled hole to accommodate bolt or screw heads
● Countersinking: Creating a conical recess at the hole's entrance to allow flush fitting of flat-head screws
Common Types of Holes in Engineering
Simple Holes

What is a Simple Hole?
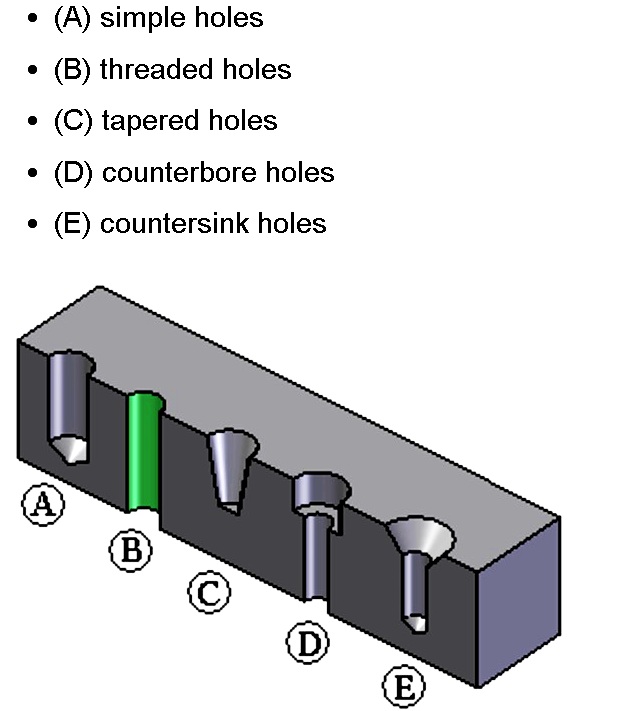
A simple hole is the most basic type of hole used in engineering. It's a circular cut-out in an object, with a constant diameter throughout. Simple holes are easy to create and have a wide range of applications.
These holes can be made using various methods, such as drilling, punching, or laser cutting. The choice of method depends on the material, the required precision, and the production volume.
Simple holes are versatile and can be found in many different products and components across various industries.
Callout Symbol of Simple Hole
On engineering drawings, simple holes are represented using the diameter symbol (Ø). This symbol is followed by the diameter of the hole.
For example, a simple hole with a diameter of 10mm would be labeled as "Ø10" on the drawing. If the hole passes through the entire object, it may be labeled as "Ø10 THRU."
The depth of a simple hole is also specified on the drawing if it doesn't pass through the object.
Uses of Simple Hole
Simple holes have numerous applications in engineering. They serve various purposes, such as:
● Providing points for fastening or assembly, like accommodating bolts or screws
● Creating clearance or access for other components
● Allowing for the passage of fluids or gases
● Serving as locating or alignment features for mating parts
In assemblies, simple holes are often used to join multiple components together. They allow for the use of fasteners, such as bolts, screws, or rivets, to create secure connections.
Simple holes can also be used for weight reduction in components. By removing unnecessary material, designers can create lighter parts without compromising strength or functionality.
Additionally, simple holes can serve as conduits for fluids or gases. They allow for the passage of liquids, air, or other substances through a component or assembly.
Blind Holes
What is a Blind Hole?
A blind hole is a type of hole that doesn't go all the way through the material. It's like a pocket or cavity that has a specific depth. Blind holes are made by drilling, reaming, or milling into the material without breaking through to the other side.
The depth of a blind hole can vary depending on the application. Some blind holes are shallow, while others can be quite deep. The bottom of a blind hole can be flat, conical, or curved, depending on the shape of the cutting tool used to make it.
Blind holes are commonly used in many different products and components. They can be found in everything from engine blocks to electronic devices.
Callout Symbol of Blind Hole
On engineering drawings, blind holes are represented using the diameter symbol (Ø) followed by the depth of the hole. The depth is usually specified using a depth symbol that looks like a flag.
For example, a blind hole with a diameter of 10mm and a depth of 20mm would be labeled as "Ø10 x 20" or "Ø10 - 20 deep." If the depth symbol is used, it would look like this: "Ø10 ⚑ 20."
It's important to note that the depth of a blind hole is measured from the surface of the material to the bottom of the hole. This is different from a through hole, which goes all the way through the material.
Uses of Blind Holes
Blind holes have many different uses in engineering. Some of the most common applications include:
● Tapping: Blind holes are often used for tapping, which is the process of cutting threads into the hole to accept a screw or bolt.
● Threading: Similar to tapping, threading involves cutting threads into a blind hole to create a threaded connection.
● Locating: Blind holes can be used as locating features to help align or position components during assembly.
● Weight reduction: In some cases, blind holes can be used to reduce the weight of a component without compromising its strength or functionality.
Blind holes are also commonly used for mounting or attaching components. For example, a blind hole might be used to accept a press-fit dowel pin or a threaded insert.
In some applications, blind holes are used for lubrication or coolant delivery. The hole can be used to channel lubricant or coolant to a specific area of a component during operation.
Through Holes
What is a Through Hole?
A through hole is a type of hole that goes completely through a material or object. Unlike a blind hole, which has a specific depth, a through hole creates an opening on both sides of the material. This means you can see light through the hole from one side to the other.
Through holes can be made using various methods, such as drilling, punching, or laser cutting. The choice of method depends on the material, the required precision, and the production volume.
Through holes are very common in engineering and can be found in many different products and components. They are often used for fastening, alignment, or creating a passage for fluids or gases.
Callout Symbol of Through Holes
On engineering drawings, through holes are represented using the diameter symbol (Ø) followed by the word "THRU" or "Through."
For example, a through hole with a diameter of 10mm would be labeled as "Ø10 THRU" or "Ø10 Through" on the drawing. This indicates that the hole goes all the way through the material.
If a through hole is part of an assembly or has specific requirements, such as tolerances or surface finishes, these will also be specified on the drawing.
Uses of Through Holes
Through holes have many different uses in engineering. Some of the most common applications include:
● Fastening: Through holes are often used for bolts, screws, or other fasteners to join components together.
● Alignment: Through holes can be used as locating features to help align or position components during assembly.
● Fluid or gas flow: Through holes can create a passage for fluids or gases to move through a component or assembly.
● Weight reduction: In some cases, through holes can be used to reduce the weight of a component without compromising its strength or functionality.
Through holes are also commonly used in electrical and electronic components. For example, printed circuit boards (PCBs) often have through holes for mounting components or creating electrical connections.
In some applications, through holes are used for ventilation or cooling. The holes allow air to flow through a component or assembly, helping to dissipate heat and prevent overheating.
Interrupted Holes
What is an Interrupted Hole?
An interrupted hole is a type of hole that is not continuous or complete. It's a hole that is intersected or crossed by another feature, such as a slot, groove, or another hole. This creates a discontinuity or interruption in the hole's geometry.
Interrupted holes are typically made using a combination of drilling and milling operations. The process involves drilling a series of overlapping holes and then milling away the remaining material to create the desired shape.
Callout Symbol of Interrupted Holes
There is no specific callout symbol for interrupted holes on engineering drawings. Instead, the individual features that make up the interrupted hole are typically called out separately.
For example, if an interrupted hole consists of a series of drilled holes and a milled slot, the drawing would specify the diameter and depth of the drilled holes, as well as the width, length, and depth of the milled slot.
In some cases, the interrupted hole may be called out as a single feature, with the individual elements specified in the notes or tolerances. This is often done for clarity or simplicity, especially if the interrupted hole is a critical feature of the part.
Uses of Interrupted Holes
Interrupted holes have several different uses in engineering. Some of the most common applications include:
● Mating features: Interrupted holes can be used to create mating features that allow two parts to fit together or interact with each other.
● Clearance: Interrupted holes can provide clearance for other features or components, such as wires, cables, or fasteners.
● Weight reduction: In some cases, interrupted holes can be used to reduce the weight of a part without compromising its strength or functionality.
● Coolant or lubricant passages: Interrupted holes can create passages for coolant or lubricant to flow through a part or assembly.
One of the main advantages of interrupted holes is that they allow for complex geometries and interactions between features. By combining drilling and milling operations, designers can create holes that would be impossible to make with a single operation.
However, interrupted holes can also be more challenging to manufacture than simple holes. They require careful planning and execution to ensure that the individual features align and interact correctly. Tolerances and surface finishes may also be more critical for interrupted holes, as any misalignment or roughness can affect the function of the mating features.
Counterbore Holes
What is a Counterbore Hole?
A counterbore hole is a type of hole that has two different diameters. It consists of a larger diameter hole that is drilled part way into the material, followed by a smaller diameter hole that goes all the way through. The larger diameter portion is called the counterbore, and it's designed to accommodate the head of a bolt or screw.
Counterbore holes are typically made using a specialized drill bit called a counterbore tool. This tool has a pilot tip that drills the smaller diameter hole, and a larger diameter cutting edge that creates the counterbore.
Callout Symbol of Counterbore Holes
On engineering drawings, counterbore holes are represented using the counterbore symbol, which looks like a circle with a small square inside it. The diameter of the counterbore is specified first, followed by the depth of the counterbore. The diameter and depth of the smaller hole are also specified.
For example, a counterbore hole with a 10mm diameter counterbore that is 5mm deep, and a 6mm diameter through hole would be called out as "⌴ 10mm ⨯ 5mm, ∅6mm THRU".
Uses of Counterbore Holes
Counterbore holes are commonly used in engineering for several different applications, including:
● Flush mounting: Counterbore holes allow bolts or screws to sit flush with the surface of the material, creating a smooth and clean appearance.
● Clearance: The counterbore provides clearance for the head of the bolt or screw, allowing it to rotate freely without interference.
● Load distribution: The larger diameter of the counterbore helps to distribute the load of the bolt or screw over a larger area, reducing stress concentrations.
Counterbore holes are often used in applications where a bolted connection needs to be strong and secure, but also needs to have a clean and finished appearance. They are commonly found in automotive and aerospace components, as well as in industrial machinery and equipment.
Spotface Holes
What is a Spotface Hole?
A spotface hole is a type of hole that has a shallow counterbore, typically used to create a flat surface around the hole. The spotface is usually just deep enough to clean up any irregularities or roughness around the hole, providing a smooth and even surface for a bolt or screw to sit against.
Spotface holes are often used in casting or forging applications, where the surface of the material may be rough or uneven. By creating a spotface around the hole, designers can ensure that the fastener will have a stable and secure mounting point.
Callout Symbol of Spotface Holes
On engineering drawings, spotface holes are represented using the spotface symbol, which looks like a circle with the letters "SF" inside it. The diameter of the spotface is specified first, followed by the depth of the spotface. The diameter and depth of the main hole are also specified.
For example, a spotface hole with a 20mm diameter spotface that is 2mm deep, and a 10mm diameter through hole would be called out as "⌴ SF 20mm ⨯ 2mm, ∅10mm THRU".
Uses of Spotface Holes
Spotface holes are commonly used in engineering for several different applications, including:
● Surface preparation: Spotface holes are used to prepare the surface of a material for a bolted or screwed connection, ensuring that the fastener has a flat and stable mounting point.
● Stress distribution: The spotface helps to distribute the stress of the fastener over a larger area, reducing the risk of damage or failure.
● Sealing: In some cases, spotface holes may be used to create a sealing surface for a gasket or o-ring, helping to prevent leaks or contamination.
Application of Spotface Holes
Spotface holes are often used in applications where the surface of the material is rough or uneven, such as in castings or forgings. They are commonly found in automotive and aerospace components, as well as in industrial machinery and equipment.
Some specific applications of spotface holes include:
● Engine blocks and cylinder heads
● Transmission cases and housings
● Suspension components
● Structural frames and supports
In these applications, spotface holes help to ensure that critical fasteners have a secure and stable mounting point, even on rough or irregular surfaces. By creating a smooth and even surface around the hole, spotface holes help to improve the overall quality and reliability of the final assembly.
Countersink Holes
What is a Countersink Hole?
A countersink hole is a type of hole that has a conical-shaped opening at the top, which allows a flat-head screw to sit flush with the surface of the material. The countersink is typically wider than the diameter of the screw, and the angle of the countersink matches the angle of the screw head.
Countersink holes are often used in applications where a flush or low-profile appearance is desired, such as in aerospace or automotive components. They can also be used to reduce the risk of injury or damage from protruding screw heads.
Callout Symbol of Countersink Holes
On engineering drawings, countersink holes are represented using the countersink symbol, which looks like a triangle with a small circle at the top. The diameter of the countersink is specified first, followed by the angle of the countersink. The diameter and depth of the main hole are also specified.
For example, a countersink hole with a 10mm diameter countersink that is 90 degrees, and a 6mm diameter through hole would be called out as "⌵ 10mm ⨯ 90°, ∅6mm THRU".
Uses of Countersink Holes
Countersink holes are commonly used in engineering for several different applications, including:
● Flush mounting: Countersink holes allow flat-head screws to sit flush with the surface of the material, creating a smooth and low-profile appearance.
● Aerodynamics: In aerospace applications, countersink holes can help to reduce drag and improve aerodynamic performance by eliminating protruding screw heads.
● Safety: In some cases, countersink holes may be used to reduce the risk of injury or damage from protruding screw heads, such as in handrails or equipment panels.
Application of Countersink Holes
Countersink holes are often used in applications where a flush or low-profile appearance is important, such as in:
● Aircraft fuselages and wings
● Automotive body panels and trim
● Electronic device enclosures
● Furniture and cabinetry
In these applications, countersink holes help to create a smooth and streamlined appearance, while also providing a secure and stable mounting point for flat-head screws. The conical shape of the countersink helps to center the screw and distribute the load evenly, reducing the risk of damage or failure.
Countersink holes can be more challenging to create than other types of holes, as they require precise angles and depths to match the screw head. However, with the right tools and techniques, countersink holes can provide a high-quality and professional-looking finish to any assembly.
Counterdrill Holes
What is a Counterdrill Hole?
A counterdrill hole is a type of hole that has a cylindrical counterbore at the top, followed by a smaller diameter hole that may or may not go all the way through the material. The counterdrill is typically used to provide clearance for the head of a socket head cap screw or other types of fasteners.
Counterdrill holes are similar to countersink holes, but instead of a conical shape, the counterdrill has a cylindrical shape. This allows the fastener head to sit flush with the surface of the material, while also providing additional clearance for the head.
Callout Symbol of Counterdrill Holes
On engineering drawings, counterdrill holes are represented using the same symbol as a counterbore hole, which looks like a circle with a small square inside it. The diameter of the counterdrill is specified first, followed by the depth of the counterdrill. The diameter and depth of the main hole are also specified.
For example, a counterdrill hole with a 10mm diameter counterdrill that is 5mm deep, and a 6mm diameter blind hole that is 10mm deep would be called out as "⌴ 10mm ⨯ 5mm, ∅6mm ⨯ 10mm".
Uses of Counterdrill Holes
Counterdrill holes are commonly used in engineering for several different applications, including:
● Clearance for fastener heads: Counterdrill holes provide clearance for the heads of socket head cap screws and other types of fasteners, allowing them to sit flush with the surface of the material.
● Stress distribution: The cylindrical shape of the counterdrill helps to distribute the stress of the fastener head over a larger area, reducing the risk of damage or failure.
● Alignment: In some cases, counterdrill holes may be used to provide alignment for mating parts or to locate other features on the component.
Application of Counterdrill Holes
Counterdrill holes are often used in applications where a flush-mounted fastener is required, but additional clearance is needed for the head. Some specific applications of counterdrill holes include:
● Machinery and equipment components
● Mold and die components
● Automotive and aerospace components
In these applications, counterdrill holes provide a secure and stable mounting point for fasteners, while also allowing for easy installation and removal. The cylindrical shape of the counterdrill helps to reduce stress concentrations and improve the overall strength and durability of the assembly.
Counterdrill holes can be created using a variety of methods, including drilling, boring, and milling. The choice of method depends on the size and depth of the hole, as well as the material being machined. With the right tools and techniques, counterdrill holes can provide a high-quality and functional solution for many different engineering applications.
Tapered Holes
What is a Tapered Hole?
A tapered hole is a type of hole where the diameter gradually changes from one end to the other, creating a cone-shaped profile. The taper angle is usually specified as a ratio of the change in diameter to the length of the hole.
Tapered holes are often used in applications where a tight, secure fit is required between mating parts. The tapered shape allows for easy insertion and removal, while also providing a strong and stable connection when fully engaged.
Callout Symbol of Tapered Holes
On engineering drawings, tapered holes are represented using the taper symbol, which looks like a triangle with a small circle at the apex. The taper angle is specified using the ratio of the change in diameter to the length of the hole. For example, a taper of 1:12 means that the diameter changes by 1 unit for every 12 units of length.
The small end diameter and large end diameter of the tapered hole are also specified on the drawing. For example, a tapered hole with a small end diameter of 10mm, a large end diameter of 12mm, and a taper angle of 1:12 would be called out as "∅10mm - ∅12mm ⨯ 1:12 TAPER".
Uses of Tapered Holes
Tapered holes are commonly used in engineering for several different applications, including:

● Mating parts: Tapered holes can provide a secure and stable connection between mating parts, such as shafts and hubs or valve stems and seats.
● Alignment: The tapered shape of the hole can help to align mating parts during assembly, reducing the risk of misalignment or damage.
● Sealing: In some cases, tapered holes may be used to create a seal between mating parts, such as in hydraulic or pneumatic systems.
Application of Tapered Holes
Tapered holes are often used in applications where a tight, secure fit is required between mating parts. Some specific applications of tapered holes include:
● Machine tool spindles and tool holders
● Valve stems and seats
● Wheel hubs and axles
● Taper pins and dowels
In these applications, the tapered shape of the hole allows for easy assembly and disassembly, while also providing a strong and stable connection when fully engaged. The tapered shape also helps to distribute the load evenly across the mating surfaces, reducing the risk of damage or failure.
Tapered holes can be created using a variety of methods, including reaming, boring, and grinding. The choice of method depends on the size and angle of the taper, as well as the material being machined. With the right tools and techniques, tapered holes can provide a high-quality and functional solution for many different engineering applications.
Screw Clearance Holes
What is a Screw Clearance Hole?
A screw clearance hole is a type of hole that is slightly larger than the diameter of the screw that will pass through it. The extra space allows the screw to pass through the hole easily, without binding or getting stuck.
Screw clearance holes are typically used in applications where one part needs to be fastened to another, but the screw is not required to create a tight fit. The clearance hole allows the screw to be inserted and removed easily, without damaging the parts or the screw itself.
Callout Symbol of Screw Clearance Holes
On engineering drawings, screw clearance holes are represented using the standard hole symbol, which looks like a circle with a leader line pointing to it. The diameter of the hole is specified on the leader line, along with any additional information such as the type of screw that will be used.
For example, a clearance hole for a 1/4"-20 screw would be called out as "∅0.266 THRU", indicating a hole diameter of 0.266 inches and a through hole.
Uses of Screw Clearance Holes
Screw clearance holes are commonly used in engineering for several different applications, including:
● Fastening: Screw clearance holes are used to fasten two or more parts together using screws or bolts. The clearance hole allows the screw to pass through easily, without creating a tight fit.
● Adjustability: In some cases, screw clearance holes may be used to allow for adjustability between parts. The clearance hole allows the screw to be loosened and tightened as needed, without damaging the parts.
● Alignment: Screw clearance holes can also be used to help align parts during assembly. The larger diameter of the hole allows for some wiggle room, making it easier to line up the parts correctly.
Application of Screw Clearance Holes
Screw clearance holes are often used in applications where a non-permanent, adjustable fastening is required. Some specific applications of screw clearance holes include:
● Furniture assembly
● Machine guards and covers
● Electrical enclosures and panels
● Automotive and aerospace components
In these applications, screw clearance holes provide a simple and effective way to fasten parts together, while also allowing for easy assembly and disassembly. The larger diameter of the hole also helps to reduce stress concentrations around the fastener, improving the overall strength and durability of the assembly.
Screw clearance holes can be created using a variety of methods, including drilling, punching, and laser cutting. The choice of method depends on the size and shape of the hole, as well as the material being machined. With the right tools and techniques, screw clearance holes can provide a reliable and cost-effective solution for many different engineering applications.
Tapped Holes
What is a Tapped Hole?
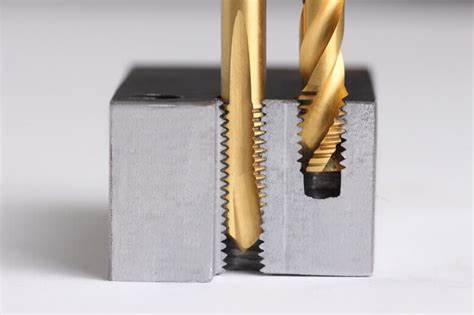
A tapped hole is a type of hole that has threads cut into it using a tool called a tap. The threads allow a screw or bolt to be screwed into the hole, creating a strong and secure fastening point.
Tapped holes are typically created by first drilling a hole in the material, then using a tap to cut the threads into the hole. The tap is essentially a screw with sharp cutting edges that remove material as it is rotated into the hole.
Callout Symbol of Tapped Holes
On engineering drawings, tapped holes are represented using a special symbol that indicates the size and type of thread being used. The most common standard for tapped holes is the metric standard, which uses the letter "M" followed by the nominal diameter of the hole in millimeters.
For example, a tapped hole with an M8 thread would be called out as "M8 x 1.25", where the "1.25" indicates the pitch of the thread (the distance between each thread).
Uses of Tapped Holes
Tapped holes are commonly used in engineering for several different applications, including:
● Fastening: Tapped holes are used to create strong and secure fastening points for screws and bolts. The threads in the hole grip the threads on the screw or bolt, holding it tightly in place.
● Assembly: Tapped holes are often used to assemble multiple parts together into a single unit. By using screws or bolts to fasten the parts together through tapped holes, a strong and stable assembly can be created.
● Adjustment: In some cases, tapped holes may be used to allow for adjustment or alignment of parts. By loosening or tightening the screw or bolt in the tapped hole, the position of the part can be fine-tuned.
Application of Tapped Holes
Tapped holes are used in a wide variety of applications across many different industries, including:
● Automotive: Tapped holes are used extensively in automotive manufacturing for assembling engines, transmissions, and other components.
● Aerospace: Tapped holes are used in aerospace applications for assembling aircraft structures, engines, and other components.
● Industrial machinery: Tapped holes are used in industrial machinery for assembling and fastening components such as gears, bearings, and housings.
In these applications, tapped holes provide a strong, secure, and reliable means of fastening and assembling components. The threads in the hole create a large surface area for the screw or bolt to grip, distributing the load evenly and reducing the risk of failure.
Tapped holes can be created in a variety of materials, including metals, plastics, and composites. The choice of material and thread size depends on the specific application and the loads that will be applied to the fastening point. With the right tools and techniques, tapped holes can provide a versatile and effective solution for many different engineering challenges.
Threaded Holes
What is a Threaded Hole?
A threaded hole is a type of hole that has threads cut into it, allowing a screw or bolt to be threaded into the hole. Threaded holes are similar to tapped holes, but the term "threaded hole" is often used more generally to refer to any hole with threads, regardless of how the threads were created.
Threaded holes can be created using a variety of methods, including tapping, thread milling, and thread forming. The choice of method depends on the material being threaded, the size and type of thread required, and the production volume.
Callout Symbol of Threaded Holes
On engineering drawings, threaded holes are represented using a symbol that indicates the size and type of thread being used. The symbol consists of the thread designation, such as "M" for metric threads or "UN" for unified threads, followed by the nominal diameter and pitch of the thread.
For example, an M10 x 1.5 threaded hole would be called out as "M10 x 1.5", where "M10" indicates a metric thread with a nominal diameter of 10mm, and "1.5" indicates the pitch of the thread (the distance between each thread).
Uses of Threaded Holes
Threaded holes are commonly used in engineering for several different applications, including:
● Fastening: Threaded holes are used to create strong and secure fastening points for screws and bolts. The threads in the hole grip the threads on the screw or bolt, holding it tightly in place.
● Adjustment: Threaded holes can be used to allow for adjustment or alignment of parts. By turning the screw or bolt in the threaded hole, the position of the part can be fine-tuned.
● Assembly: Threaded holes are often used to assemble multiple parts together into a single unit. By using screws or bolts to fasten the parts together through threaded holes, a strong and stable assembly can be created.
Application of Threaded Holes
Threaded holes are used in a wide variety of applications across many different industries, including:
● Automotive: Threaded holes are used extensively in automotive manufacturing for assembling engines, transmissions, and other components.
● Aerospace: Threaded holes are used in aerospace applications for assembling aircraft structures, engines, and other components.
● Consumer products: Threaded holes are used in many consumer products, such as electronics and appliances, for assembling and fastening components.
In these applications, threaded holes provide a strong, secure, and reliable means of fastening and assembling components. The threads in the hole create a large surface area for the screw or bolt to grip, distributing the load evenly and reducing the risk of failure.
Threaded holes can be created in a variety of materials, including metals, plastics, and composites. The choice of material and thread size depends on the specific application and the loads that will be applied to the fastening point. With the right tools and techniques, threaded holes can provide a versatile and effective solution for many different engineering challenges.
Features to Consider When Creating Holes
When creating holes in engineering, several key features must be considered to ensure the desired outcome. These features include depth, diameter, tolerance, and the challenges posed by difficult-to-machine materials. Let's explore each of these aspects in more detail.

Depth and Its Impact
The depth of a hole plays a crucial role in its functionality and the overall performance of the end product. In blind holes, the depth determines the amount of material remaining at the bottom, which can affect the strength and stability of the component. Accurately controlling the depth is essential to prevent breaking through the other side of the workpiece unintentionally.
The depth of a hole also influences the choice of cutting tools and machining parameters. Deeper holes may require specialized tools, such as deep hole drills or gun drills, to maintain straightness and avoid deflection. The cutting speed and feed rate may need to be adjusted to accommodate the increased depth and to ensure proper chip evacuation.
Moreover, the depth of a hole can impact the surface finish and dimensional accuracy. As the depth increases, it becomes more challenging to maintain a consistent surface finish and to control the size and shape of the hole. Therefore, it is crucial to consider the depth requirements carefully and to select the appropriate machining processes and tools to achieve the desired results.
Diameter Selection
Choosing the right diameter for a hole is another critical factor in engineering applications. The diameter of a hole can affect the strength, functionality, and compatibility of the component with other parts. When selecting the diameter, engineers must consider the purpose of the hole, the loads it will bear, and the mating components it will interact with.
In many cases, standard drill sizes are used to create holes with common diameters. These standard sizes are readily available and can simplify the manufacturing process. However, there may be instances where a non-standard diameter is required to meet specific design requirements. In such cases, custom tools or specialized machining techniques may be necessary.
The diameter of a hole also influences the choice of fasteners and other hardware that will be used in conjunction with the hole. For example, clearance holes must be sized appropriately to allow bolts or screws to pass through without interference, while threaded holes must have the correct diameter and thread pitch to engage with the mating fastener securely.
Tolerance Requirements
Tolerance is a critical consideration in hole making, as it determines the acceptable range of variation in the size, shape, and position of the hole. The required tolerance depends on the specific application and the functionality of the component. Tighter tolerances may be necessary for high-precision assemblies, while looser tolerances may be acceptable for less critical applications.
To achieve the desired tolerance, engineers must carefully select the appropriate machining processes and tools. Some processes, such as reaming or honing, can produce holes with very tight tolerances, while others, such as drilling or punching, may have more significant variations. The choice of cutting tools, machining parameters, and workholding methods can also affect the achievable tolerance.
In addition to size and shape tolerances, engineers must also consider positional tolerances, which relate to the location of the hole relative to other features on the component. Positional tolerances can be critical for ensuring proper alignment and fit between mating parts. Specialized tools, such as jigs or fixtures, may be used to maintain positional accuracy during the machining process.
Machining Difficult Materials
Some materials pose significant challenges when it comes to hole making. These difficult-to-machine materials may include:
● Superalloys: High-strength, heat-resistant alloys used in aerospace and energy applications.
● Titanium: Lightweight, strong, and corrosion-resistant, but prone to work hardening and heat generation during machining.
● Ceramics: Hard, brittle materials that require specialized tools and techniques to avoid fracture and chipping.
● Composites: Materials made from multiple constituents, such as carbon fiber-reinforced polymers, which can delaminate or fray during machining.
When machining holes in these challenging materials, engineers must employ appropriate strategies to overcome the specific difficulties associated with each material. For example:
● Using sharp, high-quality cutting tools with wear-resistant coatings.
● Applying appropriate cutting speeds and feed rates to minimize heat generation and tool wear.
● Employing coolants and lubricants to reduce friction and heat buildup.
● Implementing pecking cycles or other techniques to break chips and avoid tool breakage.
● Utilizing specialized tool geometries or materials, such as polycrystalline diamond (PCD) or cubic boron nitride (CBN).


