Have you ever wondered why some injection-molded parts come out smooth and perfect, while others have unsightly blemishes or get stuck in the mold? The answer lies in draft angles – a critical aspect of injection mold design that can make or break your product's quality.
In this post, you'll learn about the importance of draft angles, their benefits, and best practices. Stay tuned to master this essential aspect of injection molding.
What is a Draft Angle?
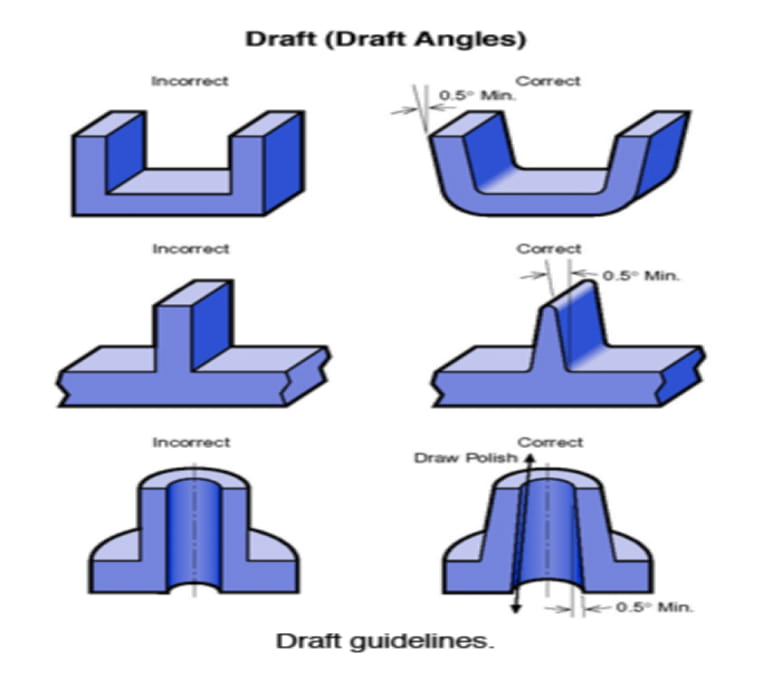
A draft angle is a slight taper or slope added to the walls of an injection-molded part. It's a crucial design element that ensures the part can be easily released from the mold after cooling.
Why are draft angles so important? Here's why:
They reduce friction between the part and the mold during ejection
They minimize the risk of part deformation or damage
They help maintain the part's desired shape and dimensions
They prolong the life of the mold by reducing wear and tear
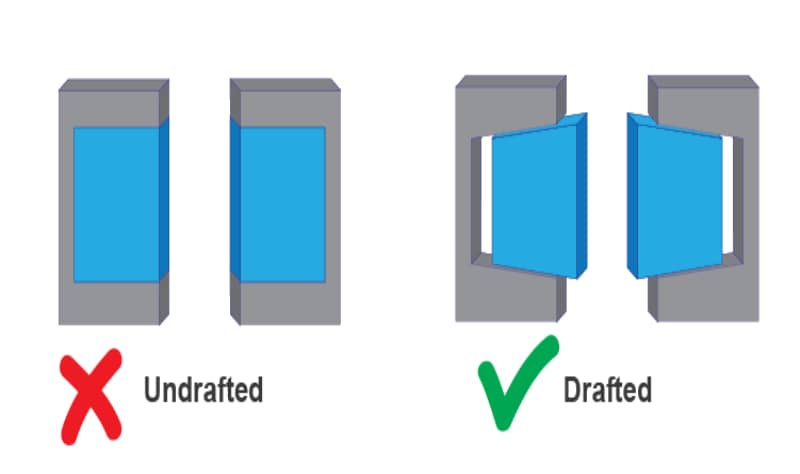
Without proper draft angles, parts can stick to the mold, leading to:
So, how much draft do you need? It depends on several factors, such as:
As a general rule of thumb, aim for a minimum draft angle of 1° to 2° per side. For deeper parts or textured surfaces, you may need to increase it to 3° or more.
Why is Draft Angle Critical for Injection Molding?
Have you ever tried to pull a tightly fitted object out of a container? It can be a real struggle, right? The same principle applies to injection molding. Without proper draft angles, parts can get stuck in the mold, leading to a host of problems.
Reduces Friction and Damage During Part Ejection
One of the primary reasons draft angles are so important is that they reduce friction between the part and the mold during ejection. This helps to prevent:
Part deformation
Surface scratches
Ejector pin marks
By allowing the part to release smoothly from the mold, draft angles minimize the risk of damage and ensure a higher quality finished product.
Minimizes Wear and Tear on the Mold
Molds are a significant investment, and you want them to last as long as possible. Draft angles play a crucial role in reducing wear and tear on the mold during the ejection process. They help to:
Distribute ejection forces evenly
Prevent abrasion and gouging
Extend the mold's lifespan
Ensures Smooth, Uniform, and Unscratched Finishes
When it comes to injection molding, appearance matters. Draft angles help to maintain the desired surface finish of your parts by:
Preventing drag marks and scratches
Ensuring a consistent, uniform finish
Preserving the integrity of textures and patterns
Reduces Cooling Time and Production Costs
Draft angles also play a role in optimizing the injection molding process itself. They can help to:
Reduce cooling time by allowing parts to release from the mold more easily
Eliminate the need for complex ejection setups
Lower overall production costs by increasing efficiency and reducing scrap rates
In short, draft angles are a small but mighty design feature that can have a big impact on the success of your injection molding project. They ensure better part quality, longer mold life, and a more efficient production process – all of which translate to cost savings and a better bottom line.
How to Determine the Optimal Draft Angle
Choosing the right draft angle for your injection-molded part can feel like a balancing act. Too little draft, and you risk part ejection issues. Too much, and you may compromise the part's functionality or appearance. So, how do you find that sweet spot? Here are some key factors to consider:
Wall Thickness
Thinner walls typically require larger draft angles to prevent warping and ensure smooth ejection. As a general rule, aim for:
| Wall Thickness | Minimum Draft Angle |
| 0.040 in. | 1° |
| 0.060 in. | 0.5° |
| 0.080 in. | 0.5° |
| >0.100 in. | 0.5° |
Material Selection
Different materials have different shrink rates and ejection requirements. For example:
Ejection Mechanism
The type of ejection system used (e.g., pins, sleeves, or blades) can impact the required draft angle. Discuss this with your molder to ensure compatibility.
Surface Finish and Texture
Textured surfaces generally need more draft than smooth surfaces. A good rule of thumb is to add 1.5° of draft per 0.001" of texture depth.
Wall Depth
Deeper walls require larger draft angles to prevent sticking and ease ejection. Here are some guidelines based on wall depth:
| Wall Depth | Minimum Draft Angle |
| 0.25 in. | 0.5° |
| 0.5 in. | 1° |
| 0.75 in. | 2° |
| 1 in. | 2° |
| 1.5 in. | 2° |
| 2 in. | 2° |
| FEATURE DEPTH | MINIMUM THICKNESS/DRAFT |
|
|
|
| 0.25 in. | 0.040 in./0.5° | | | |
| 0.5 in. | 0.040 in./1° | 0.060 in./0.5° | | |
| 0.75 in. | 0.040 in./2° | 0.060 in./1° | 0.080 in./0.5° | |
| 1 in. | | 0.060 in./2° | 0.080 in./1° | >0.100 in./0.5° |
| 1.5 in. | | | 0.080 in./2° | >0.100 in./1° |
| 2 in. | | | | >0.100 in./2° |
General Guidelines for Draft Angles
Here are some general rules for determining draft angles:
Standard Draft: 1.5 to 2 degrees is ideal for most parts up to 2 inches deep.
Depth Adjustment: Add 1 degree for every inch of part depth beyond 2 inches.
Directional Draft: Always draft towards the "top" of the mold.
Textured Parts: Add 1.5 degrees per 0.001 inch of texture depth.
Component Drafting: All parts of a piece should have a draft angle.
Metal-on-Metal Molding: Use at least 3 degrees of draft.
Dual-Sided Drafting: Parts with a middle parting line need draft on both sides.
Vertical Surfaces: Include a minimum of 0.5 degrees of draft.
Best Practices for Designing Draft Angles

Designing for draft can feel like an art as much as a science. To help you navigate the process, we've compiled some best practices gleaned from years of injection molding experience.
Start Early
One of the most important things you can do is incorporate draft angles early in the design process. This helps to:
Avoid costly redesigns later on
Ensure your part can be manufactured efficiently
Identify potential ejection issues before they become problems
Use a Core-Cavity Approach
If your part requires a smooth, high-quality outer surface, consider using a core-cavity approach. This involves:
This approach allows the part to shrink away from the cavity surface during cooling, ensuring a clean release and a pristine finish.
Draft All Vertical Surfaces
Every vertical surface on your part should have some degree of draft, including:
Ribs
Gussets
Louvers
Bosses
Snaps
Even if you can't achieve the ideal draft angle, remember: any draft is better than no draft at all!
Consider the Reference Face
When adding draft to your part, think carefully about the reference face from which the draft will be applied. This can impact:
Choose a reference face that minimizes any negative effects on the part's form, fit, and function.
Don't Forget Side-Action Features
If your part has features that require side-action in the mold (e.g., holes, slots, or undercuts), be sure to add draft to these surfaces as well. This will ensure clean, easy ejection and prevent damage to the mold.
More Draft for Abrasive Materials
Some materials, like glass-filled nylon or polycarbonate, can be abrasive and cause wear on the mold over time. For these materials, it's best to use slightly larger draft angles (3°+) to minimize friction and extend the life of the tool.
Troubleshooting Draft Angle Issues
Even with careful planning and design, draft angle issues can still arise during the injection molding process. Here's how to identify and address them.
Identifying Insufficient Draft
How can you tell if your part has insufficient draft? Look for these telltale signs:
Difficulty ejecting the part from the mold
Visible drag marks or scratches on the part surface
Deformation or warping of the part after ejection
Excessive wear or damage to the mold cavity
If you notice any of these issues, it's time to take a closer look at your draft angles.
Correcting Draft in Design
The best time to address draft angle issues is during the design phase. Here's what you can do:
Consult with your injection molder early on
Use CAD tools to analyze and optimize draft angles
Consider alternative part geometries or orientations
Adjust the location of the parting line or gate
Making changes to your design before cutting the mold can save significant time and money in the long run.
Modifying Draft During Mold Manufacturing
If draft issues are identified after the mold has been manufactured, all is not lost. There are still some options for modifying the draft angles:
Grinding or polishing the mold cavity to increase draft
Adding a taper to the ejector pins or sleeves
Using a mold coating to reduce friction and sticking
These modifications can be effective, but they do add cost and complexity to the molding process. It's always better to address draft issues as early as possible.
| Issue | Possible Solution |
| Sticking or drag marks | Increase draft angle |
| Warping or deformation | Adjust draft direction or parting line |
| Mold damage or wear | Use more draft for abrasive materials |
Conclusion
Draft angles are crucial for injection molding. They reduce friction, ensuring smooth part release. They also protect molds from wear and tear. Using the correct draft angle enhances the surface finish and reduces cooling time, lowering production costs.
Incorporating draft angles from the start of the design process is vital. It prevents defects, speeds up production, and maintains part quality. Always consider material, wall thickness, and texture when determining the draft angle. Remember, any draft is better than none for successful molding.


